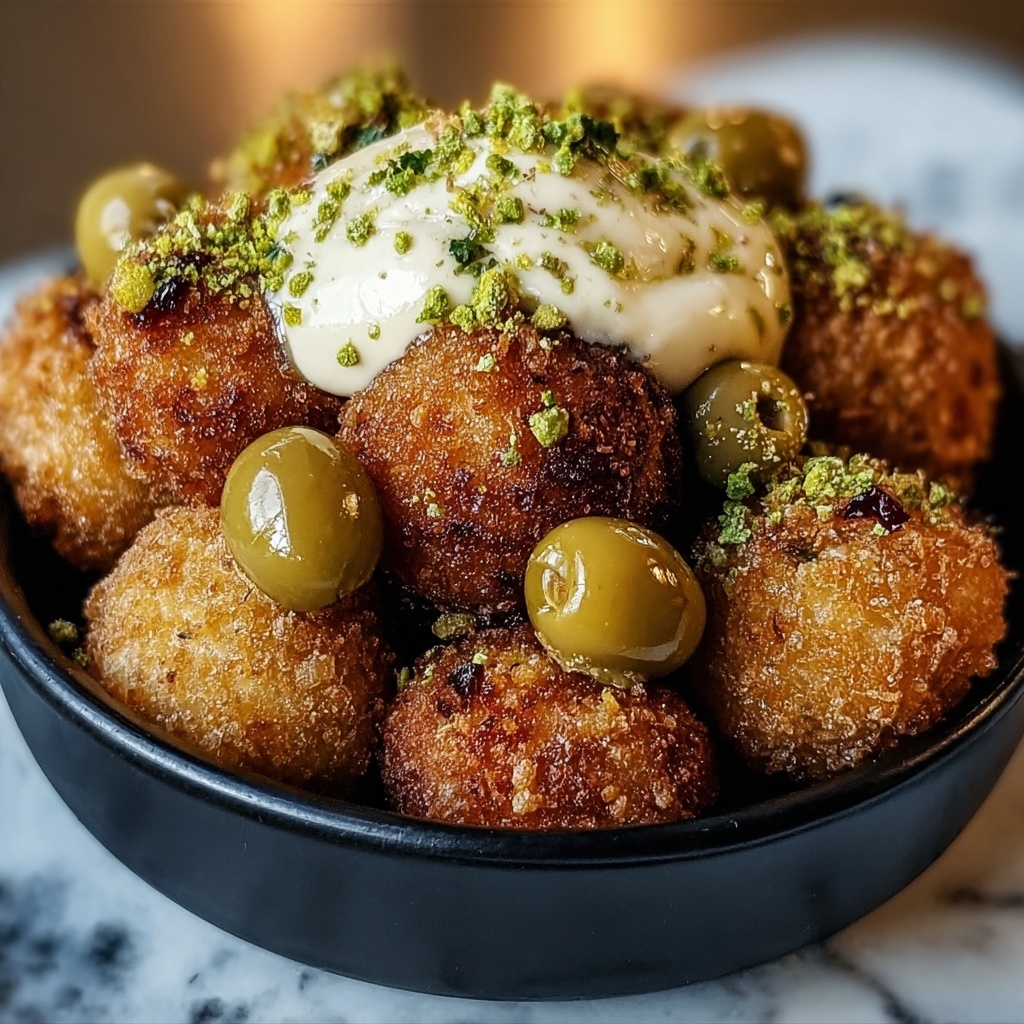
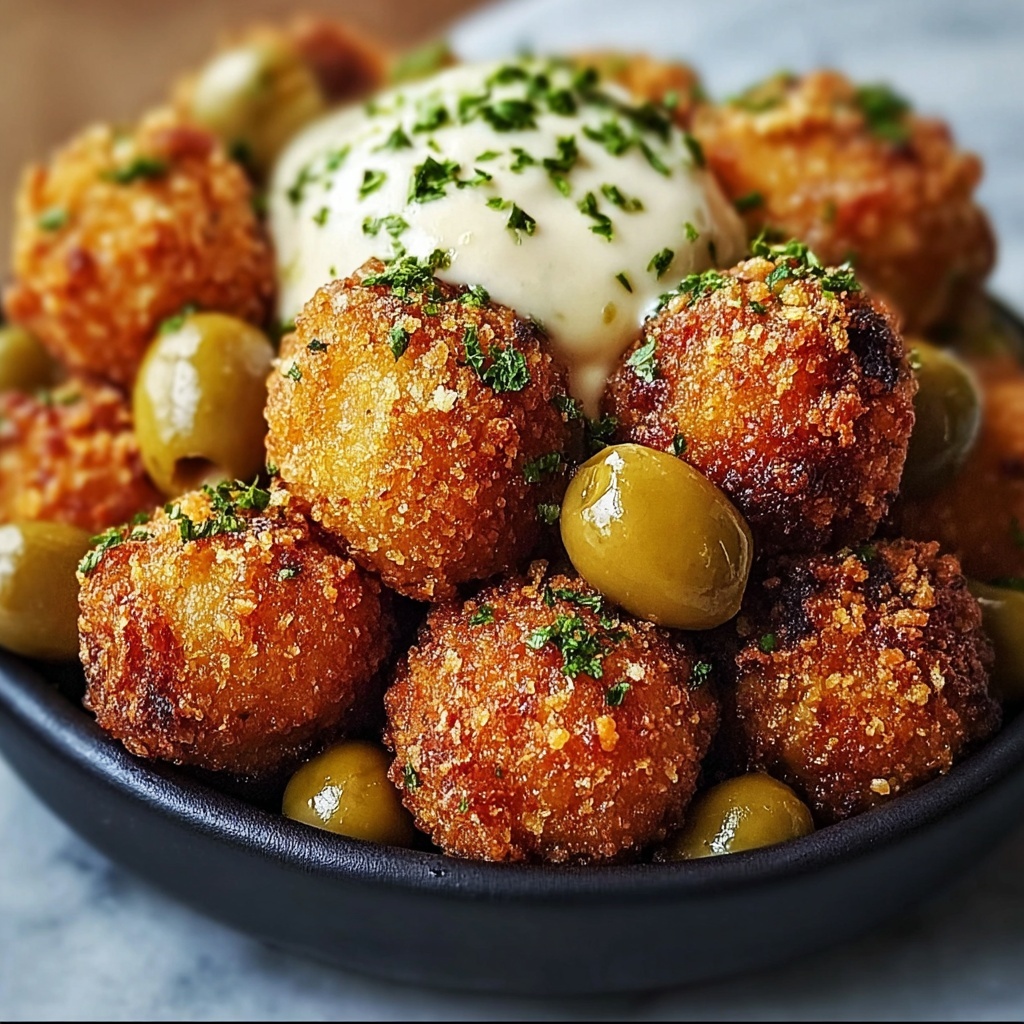
If you’re looking for a snack that’s bursting with bold flavors and crunchy textures, then this Fried Olives with Garlic Aioli Recipe is going to become your new obsession. Imagine crispy, golden-fried olives that pop with salty, briny goodness, perfectly complemented by a creamy, garlicky aioli that adds a luscious tang. This dish is simple yet sophisticated, making it a fantastic appetizer or a standout party treat that will have everyone asking for seconds. Whether you’re hosting friends or just craving a little something special, these fried olives deliver comfort and excitement in every bite.

Ingredients You’ll Need
Each ingredient in this recipe plays a crucial role, from the salty olives that bring a punch of flavor to the crunchy panko that ensures the perfect crisp. The garlic aioli ties everything together with its creamy, zesty profile. Here’s everything you’ll need to create this delightful snack:
- Small pimento-stuffed olives (5 1/2 oz jar): These olives provide a juicy, savory center that shines through after frying.
- Panko breadcrumbs (1/2 cup): Adds an ultra-crispy texture that contrasts beautifully with the tender olive inside.
- Flour (1/2 cup): Helps the breadcrumbs stick and creates a delicate coating.
- Egg, beaten (1): Acts as the perfect binder for the flour and breadcrumbs.
- Canola oil (for frying): A neutral oil with a high smoke point, ideal for getting that golden crunch without overpowering flavors.
- Mayonnaise (1/3 cup): The base of our garlicky aioli, ensuring a creamy and smooth sauce.
- Lemon juice (1 scant tbsp): Adds brightness and tang to balance the richness of the aioli.
- Minced garlic (1 heaping tbsp): The star of the aioli, delivering pungent and aromatic goodness.
- Salt and pepper (to taste): Essential seasoning to enhance all the flavors perfectly.
How to Make Fried Olives with Garlic Aioli Recipe
Step 1: Prepare the Garlic Aioli
Start by crafting the garlicky aioli because it needs a little time for the flavors to mingle. In a small bowl, combine the mayonnaise, minced garlic, lemon juice, and a pinch of salt and pepper. Mix vigorously until everything is well incorporated and smooth. Set this creamy, flavorful dip aside so it can develop its irresistible punch while you prepare the olives.
Step 2: Drain and Dry the Olives
Drain the olives from their brine thoroughly, then pat them dry with paper towels. This step is crucial to help the coating adhere properly and to avoid hot oil splatters during frying. Take your time to get them as dry as possible—this little detail makes a huge difference in the final crunch.
Step 3: Bread the Olives
Set up a classic breading station with three shallow bowls: one with the flour, one with the beaten egg, and the last with the panko breadcrumbs. Toss the olives first in the flour, coating them lightly, then dip them into the egg wash, and finally roll them generously in the panko breadcrumbs. Each coat ensures every olive gets a beautiful, crunchy shell after frying.
Step 4: Fry the Olives
Pour canola oil into a deep skillet or a saucepan to about two inches deep and heat it to 350°F (175°C). Carefully add the breaded olives in small batches to avoid crowding the pan. Fry until they turn golden brown and crispy, about 2 to 3 minutes. Use a slotted spoon to transfer them to a paper towel-lined plate to drain off excess oil. This results in perfectly crunchy, warm, and flavorful fried olives ready for dipping!
How to Serve Fried Olives with Garlic Aioli Recipe
Garnishes
Adding the right garnish can elevate this simple snack into something truly special. Fresh herbs like finely chopped parsley or basil add a pop of green and a hint of freshness that complements the rich fried olives beautifully. A sprinkle of flaky sea salt gives an extra touch of sparkle and crunch.
Side Dishes
Fried olives with garlic aioli pair wonderfully with light, refreshing sides. Think crisp cucumber slices, a zesty tomato salad, or even a chilled glass of white wine to balance the richness. This combo can easily turn into a stylish appetizer platter that’s bursting with variety and flavor.
Creative Ways to Present
Presentation makes a big difference in how your guests will enjoy this appetizer. Serve the fried olives in a rustic bowl lined with parchment paper alongside a small ramekin of your garlic aioli for dipping. For a fun twist, thread a few olives onto cocktail picks with small cubes of sharp cheese or cherry tomatoes for bite-sized party treats that are both eye-catching and delicious.
Make Ahead and Storage
Storing Leftovers
If you happen to have any leftovers, no worries! Store the fried olives in an airtight container in the refrigerator for up to two days. Keep the garlic aioli separate in a small jar or container to maintain its freshness and texture.
Freezing
While you can freeze breaded olives, it’s best to do so before frying. Place the breaded olives on a baking sheet in a single layer and freeze them for about an hour to firm up, then transfer to a freezer bag. This way, you can fry them straight from frozen whenever a craving hits!
Reheating
To bring back that delightful crunch, reheat leftover fried olives in a hot oven or air fryer rather than the microwave. Set your oven to 375°F (190°C) and heat them on a baking sheet for about 5 to 7 minutes, flipping halfway through. You’ll get a nearly fresh-out-of-the-fryer experience every time.
FAQs
Can I use different types of olives for this Fried Olives with Garlic Aioli Recipe?
Absolutely! While pimento-stuffed olives add a lovely touch of sweetness and color, you can experiment with green or black olives based on your preference just ensure they are small for easy frying.
Is it necessary to use panko breadcrumbs?
Panko breadcrumbs are preferred because they create a lighter, airier crunch compared to regular breadcrumbs. However, if that’s all you have on hand, feel free to use traditional breadcrumbs with a good crisp result.
How long can I keep the garlic aioli?
This homemade aioli will stay fresh in the refrigerator for up to a week when stored in a sealed container. Keep it chilled and fresh by making it just before serving for the best flavor.
Can I bake the olives instead of frying?
Yes, baking is a healthier alternative. Arrange the breaded olives on a baking tray and mist lightly with oil. Bake at 400°F (200°C) for 10-15 minutes or until golden brown, turning halfway through.
What can I serve with the Fried Olives with Garlic Aioli Recipe?
These fried olives are fantastic on their own or with a charcuterie board, alongside cheeses, cured meats, and fresh veggies. They also make a delicious companion to cocktails or light lunches.
Final Thoughts
This Fried Olives with Garlic Aioli Recipe is one of those magic dishes that brings people together with its simple yet irresistible flavors. Crispy, savory olives dipped in a creamy, garlicky sauce are a guaranteed crowd-pleaser that’s easy to whip up anytime you want to impress without stress. So grab a jar of olives and get frying—you’re about to discover your new favorite snack!
Print
Fried Olives with Garlic Aioli Recipe
- Prep Time: 15 minutes
- Cook Time: 10 minutes
- Total Time: 25 minutes
- Yield: 4 servings
- Category: Appetizer
- Method: Frying
- Cuisine: Mediterranean
Description
Crispy Fried Olives served with a zesty homemade Garlic Aioli make a perfect appetizer or snack. This easy recipe features pimento-stuffed olives coated in a light, crunchy panko crust and fried to golden perfection, complemented by a creamy garlic aioli with a hint of lemon.
Ingredients
Fried Olives
- 1 5 1/2 oz jar of small pimento-stuffed olives, drained
- 1/2 cup panko breadcrumbs
- 1/2 cup all-purpose flour
- 1 egg, beaten
- Canola oil, for frying
Garlic Aioli
- 1/3 cup mayonnaise
- 1 scant tablespoon lemon juice
- 1 heaping tablespoon minced garlic
- Salt and pepper, to taste
Instructions
- Prepare the Olives: Drain the jar of pimento-stuffed olives thoroughly and pat them dry with paper towels to remove excess moisture. This helps the coating adhere better and prevents splattering during frying.
- Coat the Olives: Set up a breading station with three shallow bowls: one with flour, one with beaten egg, and one with panko breadcrumbs. Roll each olive first in the flour, shaking off the excess, then dip into the egg to coat completely, and finally roll in the panko breadcrumbs to form a crispy crust. Place the coated olives on a plate ready for frying.
- Heat the Oil: Pour enough canola oil into a deep skillet or frying pan to cover the olives (about 1-2 inches deep). Heat the oil over medium-high heat until it reaches approximately 350°F (175°C), suitable for frying.
- Fry the Olives: Carefully add the coated olives in batches to the hot oil, being careful not to overcrowd the pan. Fry them for about 2-3 minutes or until golden brown and crispy. Use a slotted spoon to remove them and drain on paper towels to remove excess oil.
- Make the Garlic Aioli: In a small bowl, combine the mayonnaise, lemon juice, minced garlic, and a pinch of salt and pepper. Mix well until smooth and creamy. Adjust seasoning to taste.
- Serve: Arrange the fried olives on a serving dish alongside the garlic aioli for dipping. Serve immediately while warm and crispy for the best experience.
Notes
- Ensure olives are well dried before breading to prevent sogginess.
- Use fresh minced garlic in the aioli for a vibrant flavor.
- Maintain oil temperature to avoid greasy or undercooked bites.
- Serve the fried olives immediately for optimal crunchiness.
- Can substitute mayonnaise with vegan mayo for a vegan-friendly version.


