
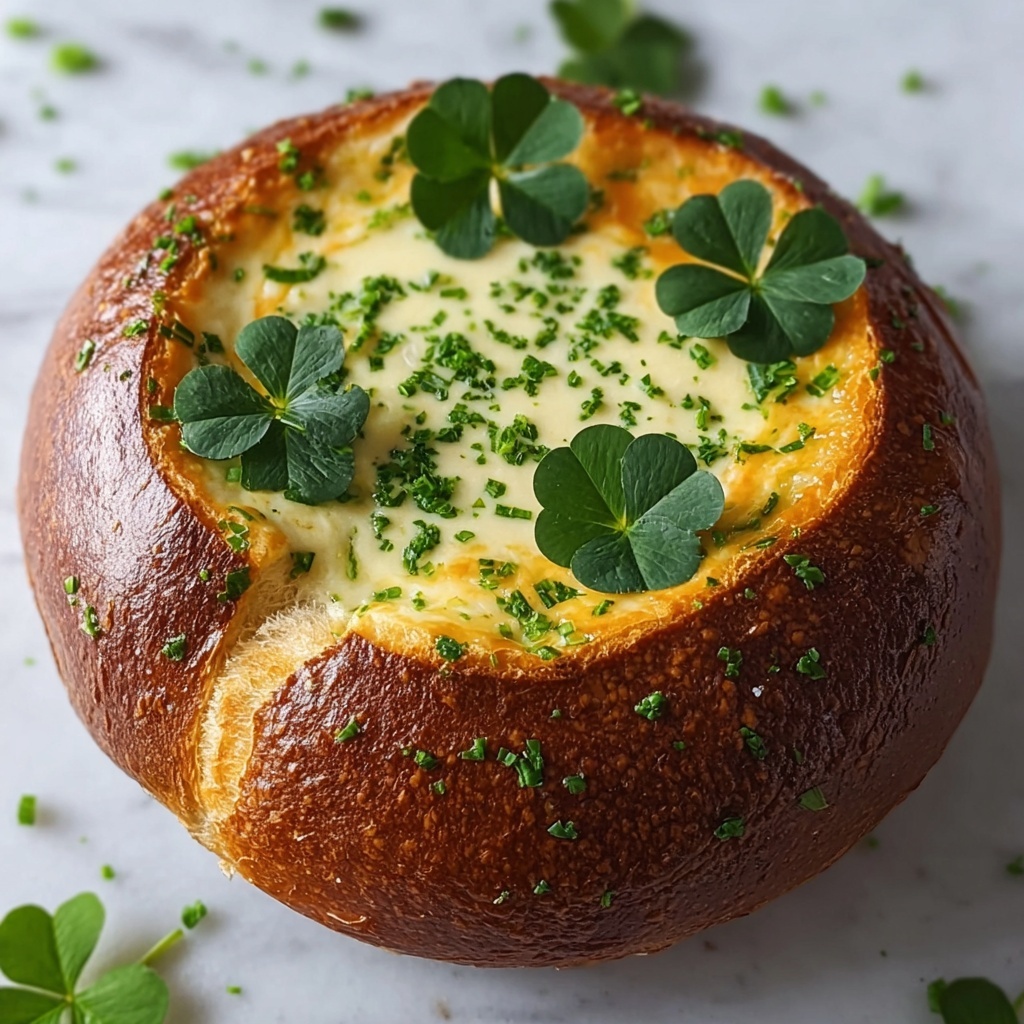
If you’re looking for a fun and delightful way to impress at your next gathering, this Clover-Shaped Bread Bowl Recipe is an absolute showstopper. It’s a charming bread bowl shaped like a clover that’s not only visually stunning but also incredibly practical for serving soups, dips, or hearty stews. The golden-brown crust combined with the soft, pillowy interior makes every bite a joy, and its clever shape is guaranteed to spark conversations and smiles around the table.
Ingredients You’ll Need
Creating this Clover-Shaped Bread Bowl Recipe is straightforward because it uses simple, pantry-friendly ingredients that come together to create a comforting, rustic loaf. Each one contributes to the structure, flavor, and texture you’ll love.
- 2 cups warm water (110°F): Perfect for activating the yeast without killing it, ensuring a good rise.
- 2 1/4 teaspoons active dry yeast (1 packet): The magic for making the dough rise and become fluffy.
- 1 tablespoon sugar: Feeds the yeast and adds just the right touch of sweetness to the crust.
- 3 tablespoons olive oil: Adds moisture and tenderness for a soft crumb and lovely flavor.
- 1 teaspoon salt: Balances flavor and strengthens the dough’s gluten structure.
- 4 cups all-purpose flour (plus extra for dusting): The base that creates the dough’s body and texture.
- 1 tablespoon melted butter (for brushing): Gives the crust a delicious golden sheen and rich taste.
How to Make Clover-Shaped Bread Bowl Recipe
Step 1: Activate the Yeast
Start by combining the warm water, yeast, and sugar in a large mixing bowl. Give it a gentle stir and let it sit for about 5 to 10 minutes until it becomes frothy on top. This step is crucial because it confirms your yeast is active and ready to work its magic in the dough.
Step 2: Prepare the Dough
Once your yeast mixture is bubbly, add the olive oil and salt, stirring to combine. Gradually add the all-purpose flour, mixing with a wooden spoon or your hands until the dough begins to come together. It should be slightly sticky but elastic enough to knead.
Step 3: Knead for Perfect Texture
Lightly flour a clean surface and knead the dough for about 8 to 10 minutes until smooth and springy. This kneading develops gluten, giving your bread structure and that satisfying chew.
Step 4: First Rise
Place the kneaded dough in a lightly oiled bowl, cover it with a clean kitchen towel or plastic wrap, and let it rise in a warm spot until it doubles in size. This usually takes about 1 hour. Patience here pays off with a lighter, airier bread bowl.
Step 5: Shape the Clover
Once risen, punch down the dough gently to release air. Divide it into four equal pieces and roll each into a ball. On a baking sheet lined with parchment paper, arrange the four balls so their edges just touch, forming a clover shape. Slightly flatten the center where they meet to create a natural “bowl” feel.
Step 6: Second Rise
Cover the shaped dough lightly and let it rise another 30 minutes. This second rise will encourage a nice puff and maintain the soft texture you want.
Step 7: Bake and Brush with Butter
Preheat your oven to 375°F (190°C). Before baking, brush the dough with melted butter for a beautiful golden-brown crust. Bake for 25 to 30 minutes or until the bread sounds hollow when tapped. Let it cool slightly before serving so it holds its shape and is comfortable to handle.
How to Serve Clover-Shaped Bread Bowl Recipe
Garnishes
This clover-shaped bread bowl is a perfect candidate for garnishes that add flavor and visual appeal. Fresh herbs like rosemary or thyme can be tucked between the cloves for an aromatic touch, while a sprinkle of flaky sea salt on top right before serving adds a delightful crunch.
Side Dishes
Pair your Clover-Shaped Bread Bowl Recipe with fresh garden salads or a rich roasted vegetable platter. These sides complement the bread’s hearty texture and make for a colorful, wholesome meal. It also goes beautifully with cheese boards or charcuterie for a cozy party spread.
Creative Ways to Present
Get creative by filling your clover bread bowl with creamy soups like tomato bisque, chowder, or spinach artichoke dip. Place it on a wooden board surrounded by crudités or crackers, and you’ve got an interactive centerpiece that’s as lovely as it is delicious.
Make Ahead and Storage
Storing Leftovers
If you have any leftovers, wrap the bread bowl tightly in plastic wrap or store it in an airtight container at room temperature for up to two days to keep it fresh and soft.
Freezing
This recipe freezes wonderfully. Wrap the fully cooled bread bowl in aluminum foil and place it in a freezer-safe bag. It will keep for up to one month, allowing you to enjoy a festive bread bowl anytime with little effort.
Reheating
To bring back that freshly baked feel, thaw frozen bread at room temperature and warm it in a preheated oven at 350°F (175°C) for 10 to 15 minutes. A light brush of butter before warming will refresh the crust’s golden glow.
FAQs
Can I use bread flour instead of all-purpose flour in this recipe?
Absolutely! Bread flour has a higher protein content which can give you an even chewier texture and better rise. Just keep in mind your dough might feel a bit stiffer.
How do I keep the bread bowl from getting soggy when filled with soup?
A helpful tip is to brush the inside of the bowl with a bit of olive oil or melted butter after baking. This creates a moisture barrier that keeps the bread sturdy longer.
Can I make this recipe vegan-friendly?
Definitely! Simply swap the butter for a plant-based alternative or extra olive oil, and use a vegan-friendly sugar. The rest of the ingredients are naturally vegan.
What types of dips or soups work best with this bread bowl?
Creamy or thick dips like spinach artichoke, queso, or hearty soups such as clam chowder, chili, and pumpkin soup shine inside the Clover-Shaped Bread Bowl Recipe’s cozy shape.
Is it okay to use instant yeast instead of active dry yeast?
You can substitute instant yeast, but you’ll want to mix it directly into your flour rather than proofing it in water first. You might also need slightly less rising time.
Final Thoughts
Trying out this Clover-Shaped Bread Bowl Recipe is like inviting joy and warmth into your kitchen with every loaf. Its playful shape and irresistible texture make it a recipe you’ll want to make again and again, whether for casual family dinners or special celebrations. Go ahead, give it a whirl, and watch your friends and family fall in love bite after bite.
Print
Clover-Shaped Bread Bowl Recipe
- Prep Time: 15 minutes
- Cook Time: 30 minutes
- Total Time: 1 hour 45 minutes
- Yield: 6 servings
- Category: Bread
- Method: Baking
- Cuisine: American
Description
This Clover-Shaped Bread Bowl is a charming and delicious bread perfect for serving soups, dips, or salads. Crafted with a soft, fluffy interior and a golden crust, this bread uses simple ingredients and a yeast dough shaped into a beautiful clover design, adding a festive and appealing touch to any meal.
Ingredients
For the Dough
- 2 cups warm water (110°F)
- 2 1/4 teaspoons active dry yeast (1 packet)
- 1 tablespoon sugar
- 3 tablespoons olive oil
- 1 teaspoon salt
- 4 cups all-purpose flour (plus extra for dusting)
For Finishing
- 1 tablespoon melted butter (for brushing)
Instructions
- Activate the Yeast: In a large bowl, combine the warm water, active dry yeast, and sugar. Stir gently and let sit for about 5-10 minutes until the mixture becomes frothy, indicating the yeast is active.
- Mix the Dough: Add olive oil, salt, and 3 cups of the all-purpose flour to the yeast mixture. Stir with a wooden spoon until the dough starts to come together. Gradually add the remaining flour, 1/2 cup at a time, mixing well after each addition until a soft dough forms.
- Knead the Dough: Transfer the dough onto a lightly floured surface and knead for about 8-10 minutes until it becomes smooth and elastic. If the dough is sticky, sprinkle with a little more flour as needed.
- First Rise: Place the dough in a lightly oiled bowl, cover it with a clean kitchen towel or plastic wrap, and let it rise in a warm place for about 1 hour or until it doubles in size.
- Shape the Clover Bread: Once risen, punch down the dough gently and divide it into four equal portions. Shape each portion into a ball. Arrange the balls closely together in a round baking dish or on a baking sheet to form a clover-like shape with four leaf-like sections.
- Second Rise: Cover the formed dough and allow it to rise again for 20-30 minutes until puffy.
- Preheat the Oven: Preheat your oven to 375°F (190°C).
- Bake the Bread: Brush the top of the dough gently with melted butter to ensure a golden crust. Bake in the preheated oven for 25-30 minutes or until the bread is golden brown and sounds hollow when tapped.
- Cool and Serve: Remove from the oven and let cool slightly before using it as a bread bowl or slicing for serving.
Notes
- Ensure water is at the correct temperature (110°F) to properly activate the yeast without killing it.
- You can add herbs or garlic to the dough for added flavor.
- Brush with melted butter after baking for a richer crust if desired.
- This bread is best served fresh but can be stored in an airtight container for up to 2 days.
- Use the hollow center of the clover bread to serve soups or dips to impress your guests.


