
There is something truly magical about nurturing your own wild yeast and bacteria into a lively, bubbling culture that can transform simple flour and water into gorgeous, tangy loaves of bread. This Sourdough Starter Recipe is a straightforward, rewarding way to cultivate your own natural leavening agent at home, giving you that authentic sourdough flavor and texture that so many bakers adore. Whether you’re a bread-making newbie or a seasoned pro looking to deepen your skills, this recipe will guide you through the charming process of creating your very own sourdough starter from scratch, step by step.
Ingredients You’ll Need
The beauty of making a sourdough starter lies in its simplicity and the care you give it. With just two foundational ingredients, you’re already on your way to capturing the essence of wild fermentation. Each component plays an essential role in nurturing the wild yeast and bacteria to develop a lively culture.
- Whole wheat or unbleached all-purpose flour: This nutrient-rich flour provides food for the yeast and bacteria, encouraging vigorous fermentation.
- Filtered or non-chlorinated water: Clean, chlorine-free water ensures the natural microbes can thrive without being inhibited.
How to Make Sourdough Starter Recipe
Step 1: Mix Your Flour and Water
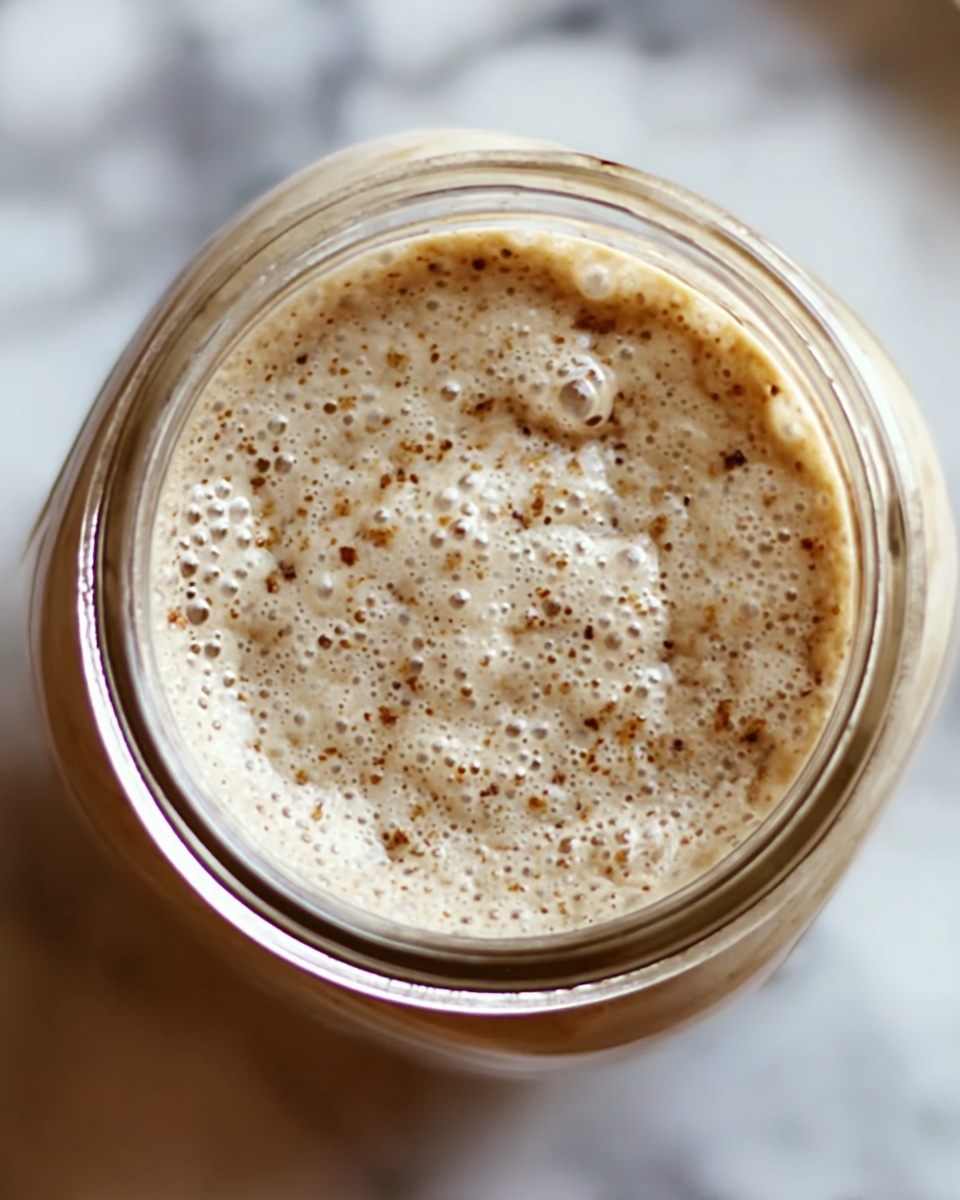
Begin by combining 1 cup (120g) of your chosen flour with 1/2 cup (120ml) of filtered water in a clean glass jar. Stir thoroughly until the mixture is smooth and there are no dry flour streaks. Cover the jar loosely with a lid or breathable cloth to allow natural yeast to enter, then leave it undisturbed at room temperature around 70°F for 24 hours. This waiting period lets the natural microbes get comfortable and start waking up.
Step 2: Discard and Feed Your Starter
After 24 hours, you might see a few bubbles, or you might not — either way, you’re on the right path. Discard about half of the starter (roughly 1/2 cup) to prevent it from growing too large and unmanageable. Feed the remaining starter with another 1 cup flour and 1/2 cup water, stirring everything well. Cover again and rest at room temperature to encourage fermentation.
Step 3: Watch for Bubbles and Aroma
By Day 3, bubbles should begin to appear, and your starter may start developing a pleasant, slightly sour aroma. These signs mean the fermentation is active and progressing. Repeat the discard and feeding routine exactly as you did on Day 2 — this keeps your starter balanced and thriving.
Step 4: Build Strength Over Days 4 to 6
During these middle days, consistency is key. Continue the daily feedings, but if your starter becomes very active—doubling in size within 4 to 6 hours—you can level up your care by feeding it twice a day, roughly every 12 hours. This extra attention helps maximize yeast growth and ensures a strong, bubbly starter.
Step 5: Ready for Baking on Day 7
By the end of the first week, your starter should be robust: bubbly, doubling reliably in size, and smelling delightfully tangy, ready to add life and flavor to your bread recipes. When not in use, store it in the refrigerator and feed it weekly to keep the culture alive and healthy.
How to Serve Sourdough Starter Recipe

Garnishes
While the starter itself is not a dish to serve, incorporating it into sourdough bread opens the door for an endless variety of garnishes. Think fresh herbs, seeds like sesame or sunflower, or even a sprinkle of sea salt on crusty loaves that you bake at home to elevate texture and flavor.
Side Dishes
Sourdough bread made from your starter pairs beautifully with everything cozy and comforting—creamy butters, artisanal cheeses, fresh garden salads, or vibrant bowlfuls of soup. The tangy bite of sourdough brings balance to rich and savory accompaniments, creating harmonious meals.
Creative Ways to Present
Imagine serving a rustic sourdough boule sliced into thick slabs for a charming brunch spread or transforming starter into pizza dough for a light, airy crust loaded with your favorite toppings. You can also turn it into pancakes or waffles—soaking up syrup with just the right hint of tang!
Make Ahead and Storage
Storing Leftovers
If you have leftover starter, always store it in a clean jar in the refrigerator. Feeding it once a week keeps the yeast alive and vibrant, so it’s ready for your next bake. When you’re ready to bake again, simply bring it back to room temperature and feed it to reactivate.
Freezing
You can freeze sourdough starter for longer-term storage by placing it in an airtight container. When thawed, it might need a few feedings to revive its strength, but freezing is a wonderful way to preserve your culture if you’re taking a break from baking.
Reheating
Since your sourdough starter is a living culture, it shouldn’t be heated like traditional dough. Instead, to ‘warm it up,’ bring the starter to room temperature and feed it regularly to boost its activity before baking.
FAQs
How long does it take to make a sourdough starter?
Typically, it takes about 7 days to develop a sourdough starter ready for baking, although some starters may take a bit longer to become fully active and bubbly.
Can I use bleached flour for my sourdough starter?
It’s best to avoid bleached flour, as the chemicals can inhibit microbial growth. Whole wheat or unbleached flours nourish the starter more effectively and lead to a healthier culture.
What if I don’t see any bubbles after a few days?
Lack of bubbles could mean your room temperature is too cool or the flour and water combination needs adjustment. Try moving the jar to a warmer spot and ensure you’re using filtered water and quality flour.
Is it necessary to discard part of the starter each day?
Yes, discarding part of the starter prevents it from becoming too acidic and unmanageable, maintaining a balanced environment for wild yeast to thrive.
How often should I feed my sourdough starter?
Feed once daily at room temperature during the initial growth phase. If very active, twice daily feedings can boost fermentation. Once established and refrigerated, weekly feeding is sufficient.
Final Thoughts
Creating your own sourdough starter is a wonderfully satisfying journey that brings alive the essence of traditional baking right in your kitchen. With this Sourdough Starter Recipe, you’ll nurture a thriving culture that opens up countless possibilities for delicious homemade breads and beyond. So roll up your sleeves, gather your simple ingredients, and dive into the joyful art of fermentation—it’s a kitchen adventure you won’t regret.
Print
Sourdough Starter Recipe
- Prep Time: 10 minutes per day
- Cook Time: 0 minutes
- Total Time: 7 days
- Yield: About 1 cup active starter
- Category: Basics
- Method: Fermenting
- Cuisine: American, European
- Diet: Vegan
Description
Learn how to create your own natural sourdough starter with this easy 7-day recipe. Using simple ingredients like whole wheat or unbleached all-purpose flour and filtered water, this guide walks you through the fermentation process to cultivate wild yeast, resulting in a bubbly, tangy starter perfect for baking flavorful sourdough bread at home.
Ingredients
Starter Ingredients
- 1 cup (120g) whole wheat flour or unbleached all-purpose flour
- 1/2 cup (120ml) filtered or non-chlorinated water (room temperature)
Instructions
- Day 1 – Mix Starter: In a clean glass jar or container, combine 1 cup flour and 1/2 cup water. Stir until there are no dry streaks left. Cover loosely with a lid or cloth and let it sit at room temperature (around 70°F) for 24 hours to begin fermentation.
- Day 2 – Discard and Feed: Check for bubbles; they may or may not be visible yet. Discard half the starter (about 1/2 cup), then add 1 cup flour and 1/2 cup water. Stir thoroughly, cover, and let it rest at room temperature for another 24 hours.
- Day 3 – Observe Activity: You should see visible bubbles and possibly detect a slightly sour smell. Repeat the discard and feeding process exactly as done on Day 2 to encourage wild yeast growth.
- Days 4–6 – Continue Feeding: Keep discarding half and feeding the starter daily. If the starter becomes very active—doubling in size within 4 to 6 hours—you can feed it twice daily (every 12 hours) to maintain its strength.
- Day 7 – Starter Ready: By now, the starter will be bubbly, have a pleasant tangy aroma, and reliably double in size after feeding. It is now ready for use in baking. Store it in the refrigerator and feed weekly if not baking regularly to keep it healthy.
Notes
- Use a kitchen scale for precise measurements to ensure starter consistency.
- Filtered or dechlorinated water is essential as chlorine can inhibit natural yeast development.
- Feeding occasional whole wheat or rye flour when using all-purpose flour can boost fermentation and starter vitality.
- Stir gently to incorporate air but avoid overmixing to preserve wild yeast balance.


