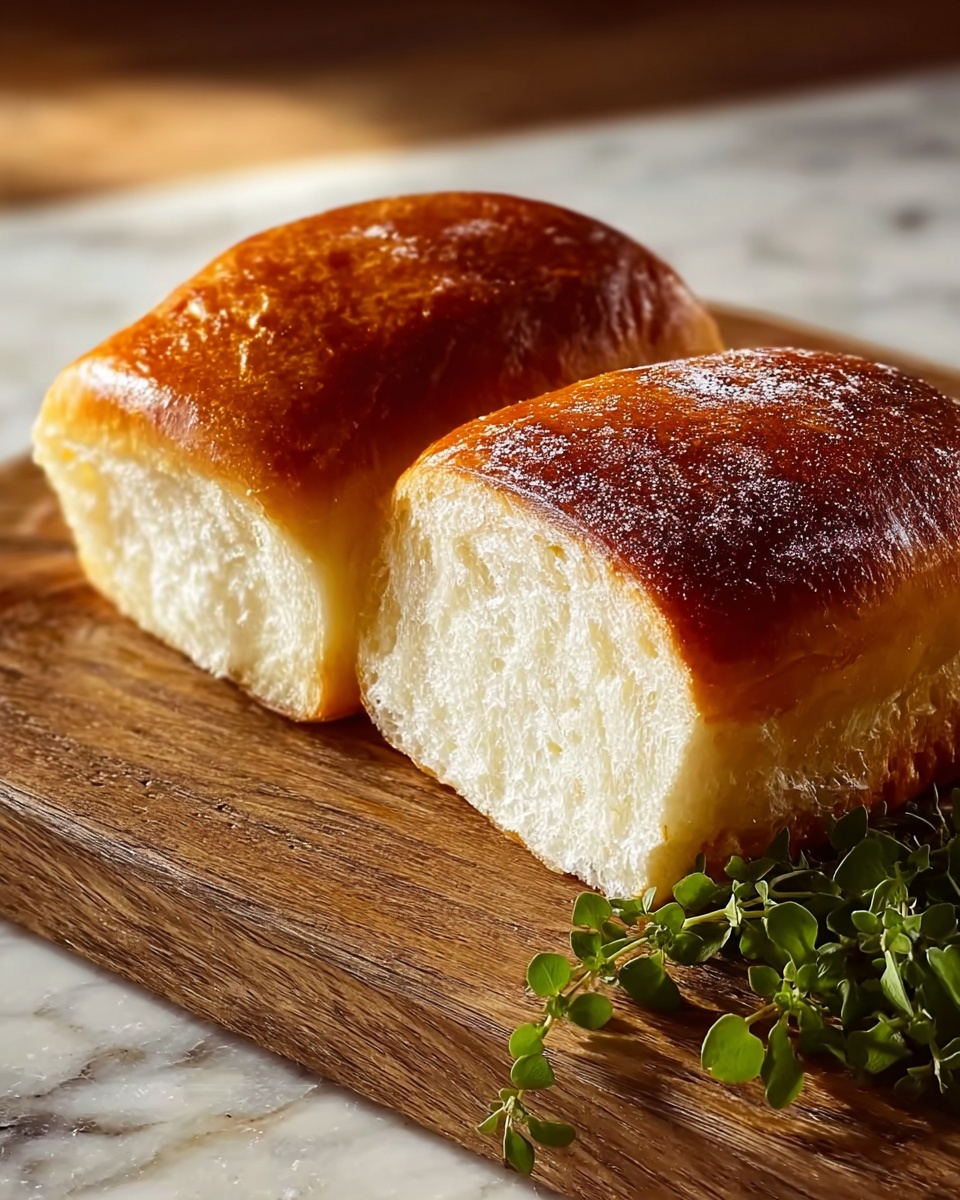
If you have ever found yourself wishing for a bread recipe that is simple, reliable, and delivers a crusty, golden loaf every single time, then you’ve landed in the perfect spot. The Only Bread Recipe You’ll Ever Need Recipe is just that—a straightforward, foolproof guide to baking bread that’s wonderfully soft on the inside with a lovely crispy crust on the outside. This recipe strips bread-making down to its essentials without sacrificing flavor or texture, making it perfect for both beginners and seasoned bakers who crave that warm, inviting homemade loaf.

Ingredients You’ll Need
Let’s talk ingredients here because each one plays a crucial role in crafting that perfect loaf. These basics come together to balance flavor, structure, and a beautiful golden crust, and you likely already have most of them in your kitchen.
- 3 cups all-purpose flour: The foundation of your bread, providing the gluten structure for that chewy yet tender crumb.
- 1 packet (2 1/4 tsp) active dry yeast: The magical agent that makes your dough rise and develop that airy texture.
- 1 tsp salt: Essential to enhance flavor and control yeast fermentation for that perfect taste.
- 1 tbsp sugar: Feeds the yeast to activate the rise and adds a slight sweetness to balance the bread.
- 1 cup warm water (110°F/45°C): Just the right temperature to awaken the yeast and help the dough come together.
- 1 tbsp olive oil (or vegetable oil): Adds moisture and contributes to a tender crumb and nice crust.
- 1 tbsp melted butter (optional, for brushing): A finishing touch that gives the loaf a rich sheen and extra flavor.
How to Make The Only Bread Recipe You’ll Ever Need Recipe
Step 1: Activate Your Yeast
Start by sprinkling the active dry yeast and sugar into the warm water. Stir gently and let it sit for about 5 to 10 minutes until it becomes frothy and bubbly. This step proves that your yeast is alive and ready to puff up your bread beautifully.
Step 2: Combine Dry Ingredients
While the yeast activates, whisk together the flour and salt in a large mixing bowl. Salt strengthens the gluten network and enhances the flavor of the finished bread, while the flour forms the body of your loaf.
Step 3: Mix Wet and Dry Ingredients
Pour the frothy yeast mixture and olive oil into the flour mixture. Using a wooden spoon or your hands, stir everything until it forms a rough dough. Don’t worry if it looks a little shaggy at this point—that’s exactly what it should look like!
Step 4: Knead the Dough
Turn your dough out onto a lightly floured surface and knead for about 8 to 10 minutes. This process develops the gluten, which gives your bread elasticity and that perfect chewy texture. The dough should become smooth, elastic, and slightly tacky but not sticky.
Step 5: First Rise
Place your dough in a lightly oiled bowl, cover it with a clean kitchen towel or plastic wrap, and let it rise in a warm, draft-free spot until it doubles in size, roughly 1 hour. This rising time lets the yeast work its magic, creating those lovely air pockets inside.
Step 6: Shape the Dough and Second Rise
Once risen, punch down the dough gently to release the air. Shape it into a loaf or ball and place it on a baking sheet or in a loaf pan. Cover again and allow it to rise another 30-45 minutes. This final lift ensures a light and fluffy interior.
Step 7: Bake Your Bread
Preheat your oven to 375°F (190°C). Before baking, brush the top with melted butter for that beautiful golden finish if desired. Bake the bread for 25 to 30 minutes until the crust is golden and the loaf sounds hollow when tapped on the bottom.
Step 8: Cool and Enjoy
Remove your bread from the oven and let it cool on a wire rack before slicing. This cooling time lets the crumb finish setting so each slice is perfectly tender and delicious.
How to Serve The Only Bread Recipe You’ll Ever Need Recipe

Garnishes
A simple brush of melted butter is an effortless way to add richness and a gorgeous sheen to your crust. If you want to get fancy, sprinkle some flaky sea salt or fresh herbs like rosemary or thyme on top just before baking.
Side Dishes
This bread is a versatile companion. Serve it alongside a steaming bowl of homemade soup, a fresh salad, or your favorite pasta dish. Its warm, comforting nature makes it the star sidekick for so many meals.
Creative Ways to Present
Try slicing the bread thick and toasting it for bruschetta topped with juicy tomatoes and basil. Or hollow out a round loaf to create a bowl for dips and spreads at your next gathering. The possibilities really are endless with this staple bread.
Make Ahead and Storage
Storing Leftovers
Wrap your cooled bread tightly in plastic wrap or place it in an airtight container to keep it fresh for up to 3 days. This helps maintain moisture and prevents it from drying out.
Freezing
If you want to extend the life of this lovely loaf, freeze it whole or sliced in a freezer bag. Make sure to squeeze out as much air as possible. It can last up to 3 months in the freezer without losing quality.
Reheating
To enjoy that freshly baked taste, thaw frozen bread at room temperature and warm it in a 350°F (175°C) oven for about 10 minutes. A quick toast or a gentle microwave zap can also revive slices wonderfully.
FAQs
Do I have to use active dry yeast?
Active dry yeast works best for this recipe because it needs to be activated in warm water, but instant yeast can also be used with slight adjustments, like adding it directly to dry ingredients and reducing proofing time.
Can I use whole wheat flour instead of all-purpose?
Yes! You can substitute whole wheat flour for part or all of the all-purpose flour, but expect a denser texture. It’s a wholesome twist that adds more fiber and a hearty flavor.
What if my dough doesn’t rise?
If your dough isn’t rising, it could be because the yeast was expired, the water was too hot or too cold, or the environment was too chilly. Always check your yeast freshness and use warm (not hot) water to keep the yeast happy.
Can I make this bread without an oven?
While an oven is ideal, you can try baking on a stovetop using a covered heavy skillet over low heat, though you may not get the same crust. A slow cooker or bread machine could also work with some adjustments.
Why is my bread too dense?
Dense bread often means not enough kneading or rising time. Make sure to knead long enough to develop gluten and allow the dough to double in size during rising for that light, airy crumb.
Final Thoughts
I’m genuinely excited for you to try The Only Bread Recipe You’ll Ever Need Recipe because it truly lives up to its name—a simple, rewarding project that fills your home with the comforting aroma of homemade bread. Whether it’s your first time baking bread or your fiftieth, this recipe is sure to become your go-to, a delicious staple you’ll return to again and again. Happy baking!
Print
The Only Bread Recipe You’ll Ever Need Recipe
- Prep Time: 15 minutes
- Cook Time: 30 minutes
- Total Time: 2 hours
- Yield: 1 loaf (about 8-10 slices)
- Category: Bread
- Method: Baking
- Cuisine: American
Description
This classic and easy bread recipe is perfect for beginners and seasoned bakers alike. With simple pantry staples and just a few steps, you can make a soft, flavorful loaf of homemade bread that’s perfect for sandwiches, toast, or simply enjoying with butter.
Ingredients
Dry Ingredients
- 3 cups all-purpose flour
- 1 packet (2 1/4 tsp) active dry yeast
- 1 tsp salt
- 1 tbsp sugar
Wet Ingredients
- 1 cup warm water (110°F/45°C)
- 1 tbsp olive oil (or vegetable oil)
- 1 tbsp melted butter (optional, for brushing)
Instructions
- Combine Dry Ingredients: In a large bowl, mix together the flour, active dry yeast, salt, and sugar until well blended.
- Add Wet Ingredients: Pour in the warm water and olive oil. Stir the mixture until a sticky dough forms.
- Knead the Dough: Transfer the dough to a floured surface and knead for about 8-10 minutes until smooth and elastic. If the dough is too sticky, sprinkle a little more flour as needed.
- First Rise: Place the kneaded dough in a lightly oiled bowl, cover with a clean kitchen towel or plastic wrap, and let it rise in a warm place for about 1 to 1.5 hours, or until it has doubled in size.
- Shape the Loaf: Gently punch down the risen dough to release air bubbles. Shape it into a loaf by folding and tucking the dough into a smooth ball or oval shape.
- Second Rise: Place the shaped dough on a greased or parchment-lined baking sheet or in a loaf pan. Cover loosely and let it rise again for about 30-45 minutes until puffed up.
- Bake: Preheat your oven to 375°F (190°C). If desired, brush the top of the dough with melted butter for a richer crust. Bake the bread for 25-30 minutes, or until the top is golden brown and the loaf sounds hollow when tapped.
- Cool: Remove the bread from the oven and let it cool on a wire rack before slicing. This helps set the crumb and prevents a gummy texture.
Notes
- Use warm water around 110°F (45°C) to activate the yeast without killing it.
- Kneading time is crucial to develop gluten for a good structure.
- Allow proper rising times for airy, fluffy bread.
- Brushing with melted butter is optional but adds flavor and softness to the crust.
- Store bread in an airtight container or wrapped in foil to keep fresh.


