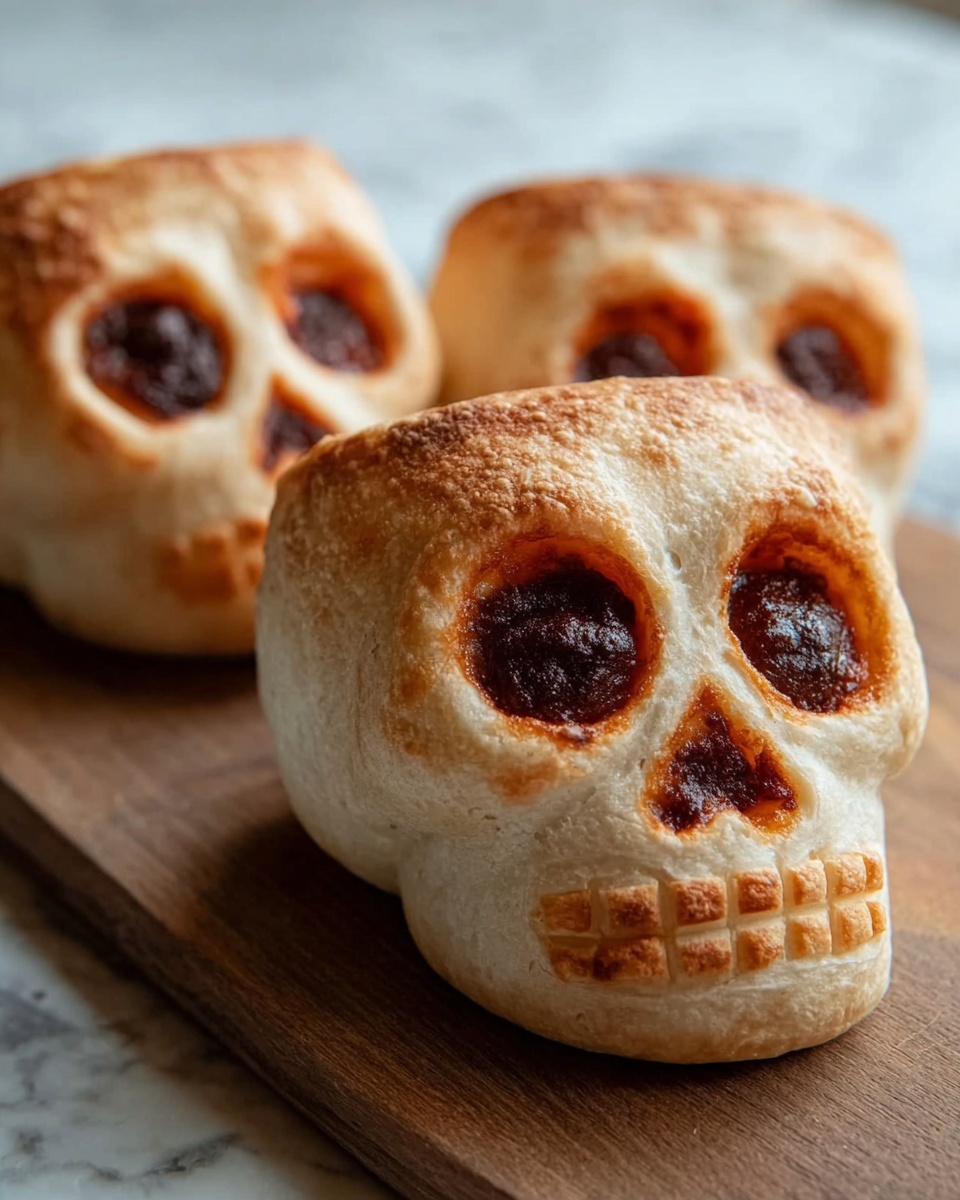
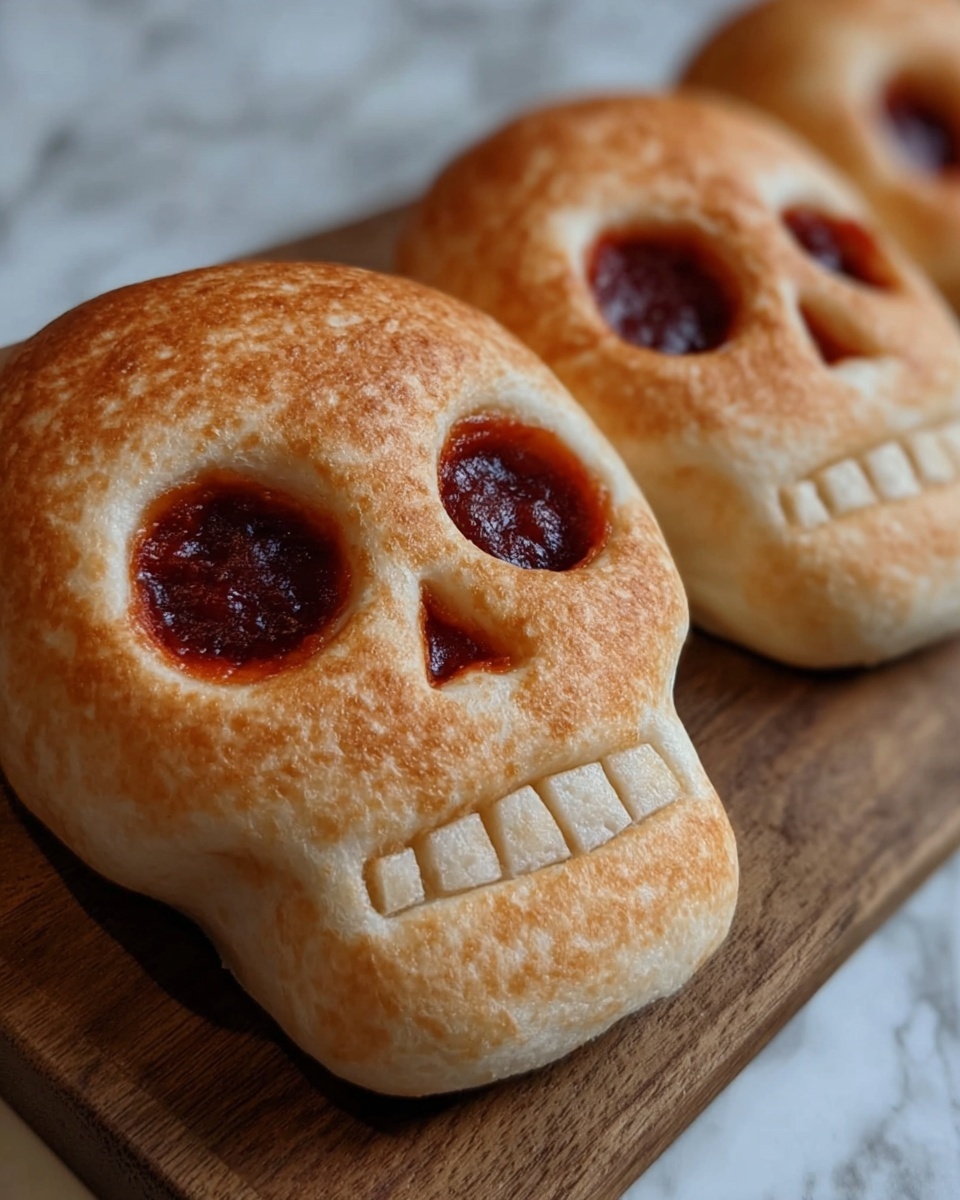
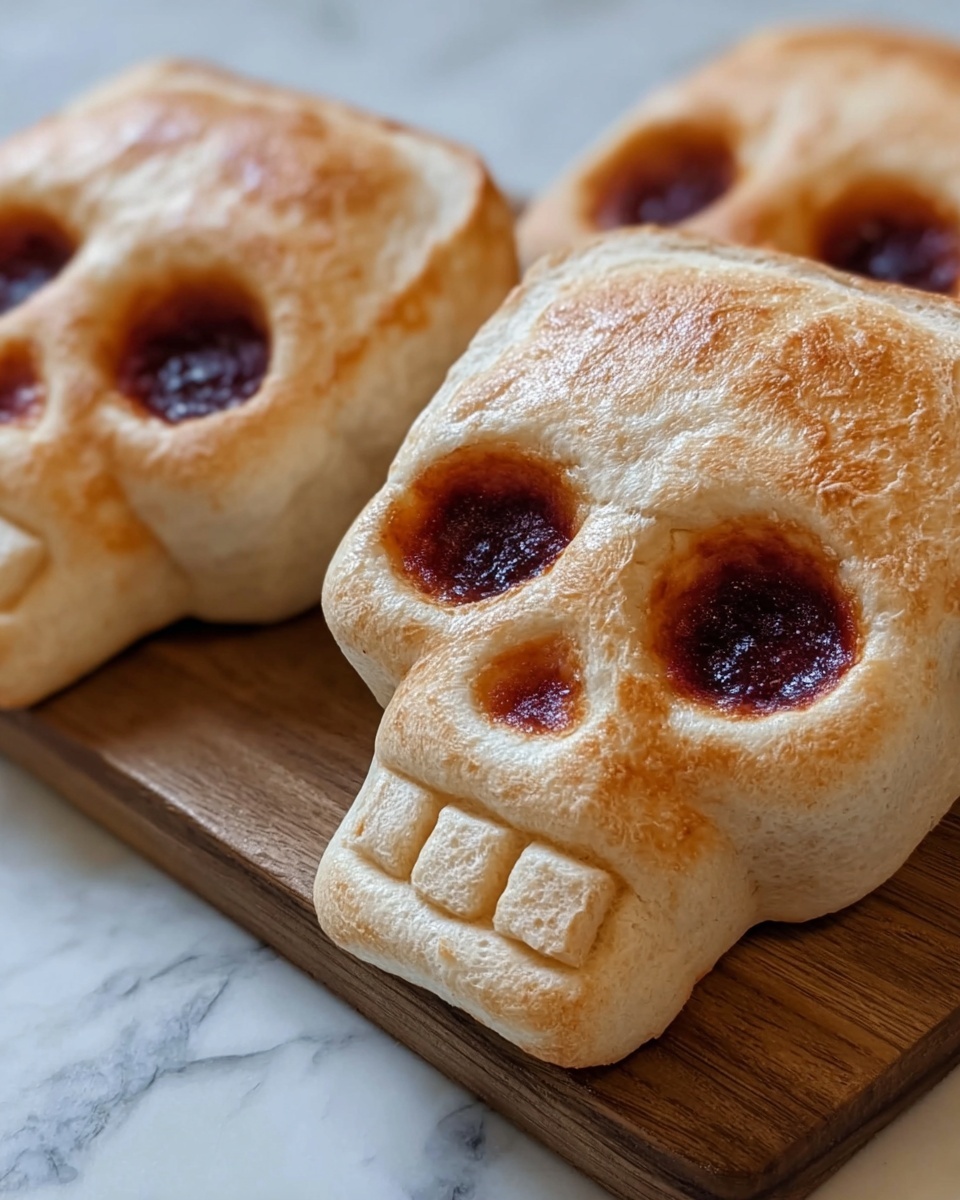
Nothing says spooky and delicious quite like the Cheesy Halloween Pizza Skulls Recipe. This fun and festive dish combines the irresistible pull of melty cheese, rich pizza sauce, and a crispy golden crust shaped into skulls that are perfect for Halloween parties or anytime you want to wow your friends and family. Each bite is a delightful mix of cheesy goodness and customizable fillings, making it a crowd-pleaser that’s as playful as it is tasty. Let me take you through every wonderful detail so you can bring these hauntingly good pizza skulls to your table!
Ingredients You’ll Need
The magic of the Cheesy Halloween Pizza Skulls Recipe lies in its simple, yet essential ingredients. Each one plays a vital role in creating layers of flavor, texture, and that unbeatable pizza classic appeal.
- 13 to 16 ounces pre-made pizza dough: This is the canvas for your skulls—a soft, pliable dough that bakes up golden and crisp.
- 3/4 to 1 cup pizza sauce: The tangy and savory base that brings depth and moisture to each pizza skull.
- 2 cups shredded mozzarella cheese: The gooey, melty cheese that makes every bite wonderfully cheesy and satisfying.
- 1/4 cup Parmesan cheese (optional): Adds a sharp, nutty layer of flavor with a bit of salty punch.
- Optional fillings: Personalize your skulls with cooked sausage, mini pepperoni, sliced black olives, chopped ham, crumbled crispy bacon, mini Italian meatballs, cooked corn kernels, baby spinach, or fresh basil for extra taste and texture.
- Marinara sauce for dipping: Perfect for dunking your pizza skulls and enhancing every bite.
- Chopped parsley or basil for garnish: Adds a fresh, vibrant touch that makes your dish pop visually and flavor-wise.
How to Make Cheesy Halloween Pizza Skulls Recipe
Step 1: Prep the Baking Pan
Begin by carefully spraying your mini skull baking pan with a non-stick cooking spray. This simple step ensures your cheesy pizza skulls will slide right out of the molds with ease after baking, keeping their spooky shapes intact.
Step 2: Prepare the Dough
Lightly dust your work surface with flour to keep the dough from sticking. Roll or stretch your pre-made pizza dough out to about 1/4 inch thickness. Then, cut the dough into six rectangles—these will fit perfectly into the skull cavities of your baking pan.
Step 3: Assemble the Skulls
Press each dough rectangle into a skull mold, making sure it fits snugly against all the edges. Fill each cavity with a generous spoonful of pizza sauce, then pile on shredded mozzarella cheese. Sprinkle a bit of Parmesan cheese if you like, and add any delicious optional fillings to customize your skulls. Top off each one with a small spoonful of sauce to keep things saucy and flavorful.
Step 4: Seal the Skulls
Fold dough over the fillings to cover each skull completely, gently pinching the edges to seal everything inside. This step locks in the cheesy, saucy goodness and shapes your skulls perfectly.
Step 5: Chill the Skulls
Before baking, refrigerate the filled baking pan while your oven preheats to 400°F (200°C). Chilling helps the dough hold its shape and leads to a crispier crust when baked.
Step 6: Bake the Pizza Skulls
Slide the baking pan into the oven and bake for 16 to 20 minutes, or until the dough turns a beautiful golden brown and is fully cooked through. Your kitchen will be filled with an irresistible aroma that makes waiting worthwhile!
Step 7: Cool and Serve
Let the pizza skulls cool in the pan for about 5 minutes so they set up and are easier to remove without breaking. Unmold carefully, garnish with chopped parsley or fresh basil, and serve alongside marinara sauce for dipping. Prepare for lots of compliments!
How to Serve Cheesy Halloween Pizza Skulls Recipe
Garnishes
Bright green parsley or fresh basil leaves are the perfect finishing touch to your Cheesy Halloween Pizza Skulls Recipe. They add a pop of color that contrasts wonderfully with the golden crust and gooey cheese, and they bring a hint of fresh herbaceous flavor that lifts the dish.
Side Dishes
Pair your pizza skulls with a crisp green salad dressed in vinaigrette for balance, or whip up a bowl of roasted garlic mashed potatoes to keep things cozy and comforting. For a fun Halloween theme, serve with carrot and celery sticks arranged like witch fingers or spooky veggies for extra crunch.
Creative Ways to Present
Turn your Cheesy Halloween Pizza Skulls Recipe into the centerpiece of your Halloween party by arranging the skulls on a platter lined with black or orange paper napkins. Add edible “blood” like a drizzle of marinara or a side of spicy red pepper sauce. You can also serve on skewers for grab-and-go fun, or build a skull-shaped pizza board incorporating your other favorite themed snacks.
Make Ahead and Storage
Storing Leftovers
If you have any leftover pizza skulls, store them in an airtight container in the refrigerator. They’ll stay fresh for up to 3 days, ready for quick snacking or another meal.
Freezing
You can freeze baked pizza skulls by placing them on a baking sheet to chill completely before transferring to freezer-safe bags or containers. They freeze well for up to 2 months, allowing you to enjoy the Cheesy Halloween Pizza Skulls Recipe whenever the craving strikes.
Reheating
To reheat, pop the pizza skulls in a preheated oven at 350°F (175°C) for about 10 minutes or until warmed through. This helps revive the crispy crust and keeps the cheese deliciously melty.
FAQs
Can I make the pizza skulls without a special skull baking pan?
Absolutely! If you don’t have a skull baking pan, you can use a muffin tin or bake them on a flat sheet as calzones, then decorate the tops with cut-out pizza dough shapes to mimic skull faces.
What are some good filling combinations?
Classic choices include mozzarella with mini pepperoni and sausage, or for a veggie twist, spinach, corn, and black olives. The great thing about this recipe is how customizable it is to everyone’s tastes.
Is it okay to use store-bought pizza sauce?
Definitely! Store-bought pizza sauce works wonderfully and saves time, but feel free to jazz it up with garlic, herbs, or a touch of red pepper flakes if you want a homemade flair.
How do I make the dough extra crispy?
Chilling the filled skulls before baking and baking them long enough at a high temperature helps create a crispier crust. You can also brush the dough with a bit of olive oil before baking for extra golden edges.
Can this recipe be made vegetarian?
Yes! Simply skip any meat fillings and load the pizza skulls with your favorite veggies and plenty of cheese. Baby spinach, mushrooms, olives, and sweet corn make delicious vegetarian options.
Final Thoughts
Making the Cheesy Halloween Pizza Skulls Recipe is not just about creating a tasty snack—it’s about adding a little festive fun to your kitchen and dinner table. These skull-shaped delights bring smiles and a bit of spooky charm that both kids and adults will adore. So go ahead, give this recipe a try and make your next Halloween celebration or casual night extra memorable and delicious.
Print
Cheesy Halloween Pizza Skulls Recipe
- Prep Time: 10 minutes
- Cook Time: 20 minutes
- Total Time: 30 minutes
- Yield: 6 mini pizza skulls
- Category: Appetizer
- Method: Baking
- Cuisine: Italian-American
- Diet: Halal
Description
Celebrate Halloween with these fun and festive Cheesy Halloween Pizza Skulls. Made with pre-made pizza dough filled with classic pizza toppings like mozzarella, Parmesan, and your favorite meats or veggies, these mini skull-shaped pizzas are perfect for a spooky party appetizer or a kid-friendly meal. They bake quickly to golden perfection and are served with marinara sauce for dipping and fresh herbs for garnish.
Ingredients
Pizza Dough
- 13 to 16 ounces pre-made pizza dough (boxed or fresh)
Fillings
- 3/4 to 1 cup pizza sauce
- 2 cups shredded mozzarella cheese
- 1/4 cup Parmesan cheese (optional)
- Optional fillings: 8 oz cooked sausage
- 6 oz mini pepperoni
- Sliced black olives
- Chopped ham
- Crumbled crispy bacon
- Mini Italian meatballs
- Cooked corn kernels
- Baby spinach
- Fresh basil
To Serve
- Marinara sauce for dipping
- Chopped parsley or basil for garnish
Instructions
- Prep the Baking Pan: Spray the mini skull baking pan with non-stick cooking spray to prevent the dough from sticking during baking.
- Prepare the Dough: Lightly dust your work surface with flour. Roll, pat, or stretch the pizza dough out to about 1/4 inch thickness. Cut the dough into 6 rectangles, one for each skull.
- Assemble the Skulls: Press each dough rectangle into a skull cavity of the baking pan, shaping it into the mold. Fill each cavity with pizza sauce, shredded mozzarella cheese, a sprinkle of Parmesan cheese if using, and any desired optional fillings such as cooked sausage, pepperoni, or veggies. Add a small spoonful of pizza sauce on top of the fillings for extra flavor.
- Seal the Skulls: Fold the dough over the fillings in each cavity and pinch the edges well to seal each pizza skull securely, ensuring no fillings leak during baking.
- Chill the Skulls: Refrigerate the filled skull molds while the oven preheats to 400°F (200°C). Chilling helps the dough hold its shape during baking.
- Bake the Pizza Skulls: Bake in the preheated oven for 16 to 20 minutes or until the dough turns golden brown and is fully cooked through.
- Cool and Serve: Allow the pizza skulls to cool in the baking pan for about 5 minutes before carefully unmolding them. Serve warm with marinara sauce for dipping and garnish with chopped parsley or fresh basil.
Notes
- You can customize the fillings with any favorite pizza toppings to suit individual tastes.
- Using a non-stick spray or lightly greasing the skull mold is essential to prevent sticking.
- Ensure the edges are sealed tightly to avoid leaking during baking.
- Let the pizza skulls cool briefly before unmolding to keep their shape intact.
- Leftovers can be reheated in the oven to maintain crispiness.


