
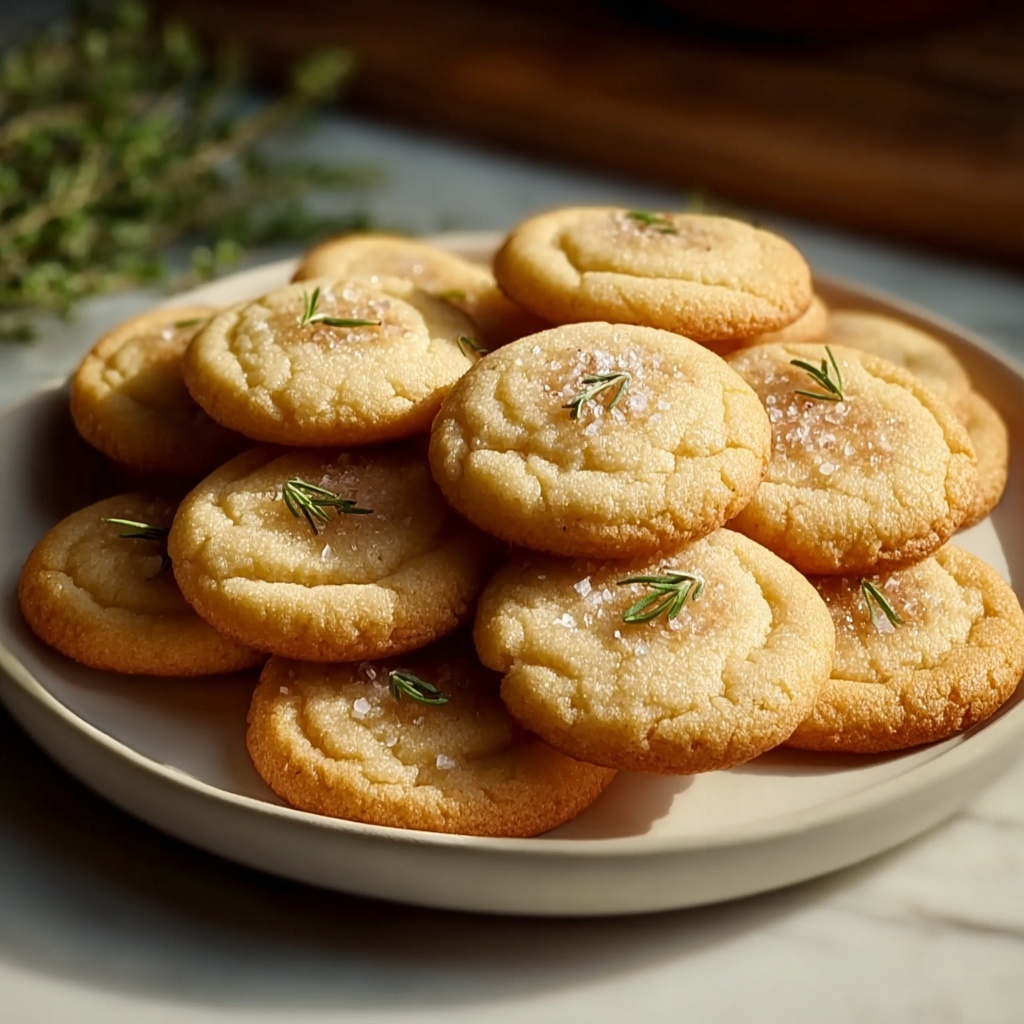
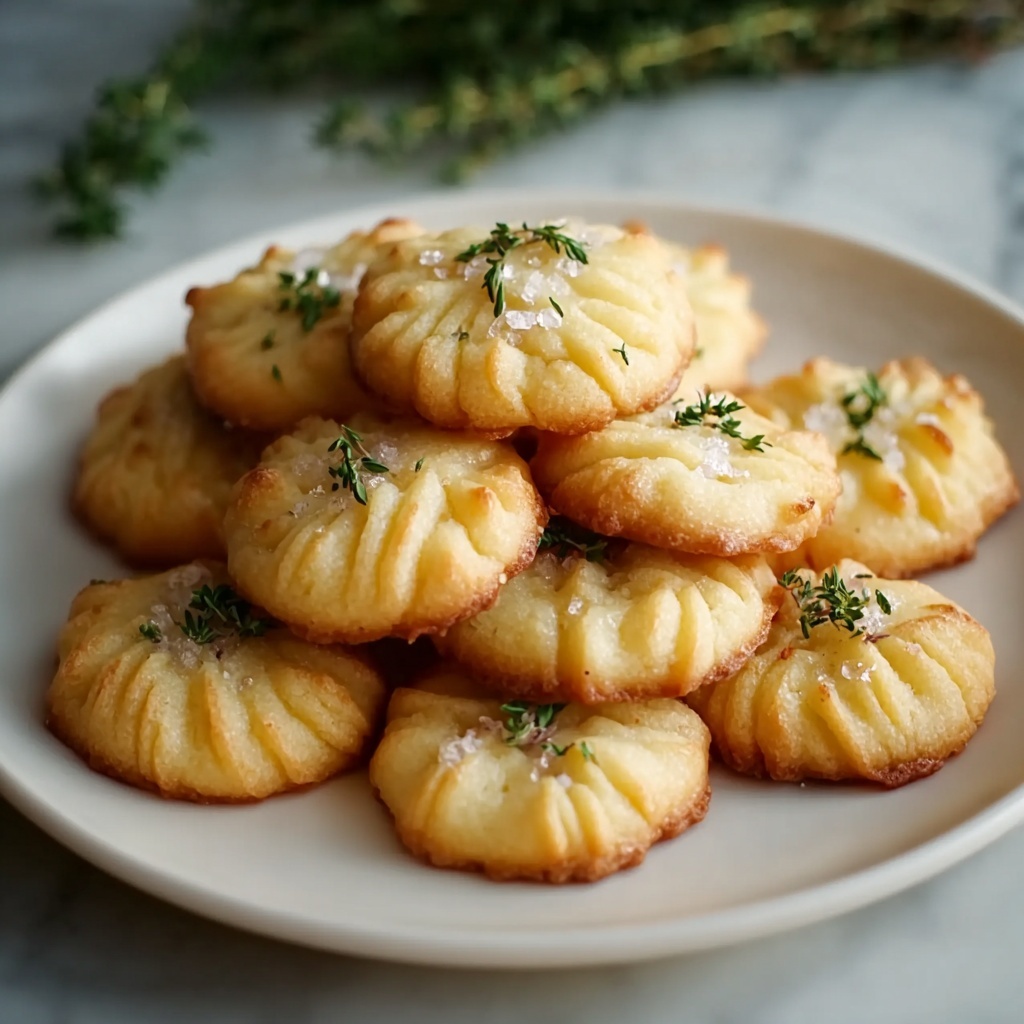
If you have a soft spot for buttery, melt-in-your-mouth treats, this Butter Cookies Recipe is going to become your new best friend in the kitchen. These cookies boast a tender crumb with just the right amount of sweetness and a delicate vanilla aroma that fills the whole house with warmth. Perfectly crisp on the edges and silky soft in the center, this classic recipe brings together simple ingredients to create an irresistible, elegant cookie that’s ideal for any occasion, whether it’s a cozy afternoon tea or a festive gathering.
Ingredients You’ll Need
This Butter Cookies Recipe relies on a handful of straightforward, pantry-friendly ingredients that each contribute something special—richness from butter, just enough sweetness from sugar, a hint of vanilla for aroma, and crispness from the flour. Let’s dive into what you’ll need:
- 8 oz unsalted butter, softened: The heart of the cookie, providing a creamy texture and rich flavor.
- 3/4 cup granulated sugar: Balances the buttery richness with just the right sweetness.
- 1/4 tsp salt: Enhances all the flavors and brings out the best in the butter and vanilla.
- 1 1/2 tsp pure vanilla extract: Adds a lovely aromatic depth that elevates this classic treat.
- 1 large egg yolk: Helps bind the dough together and gives a tender crumb.
- 2 cups all-purpose flour: The foundation that holds everything together, ensuring each bite has that perfect snap.
How to Make Butter Cookies Recipe
Step 1: Cream Together Butter, Sugar, and Vanilla
Start by beating the softened butter, sugar, salt, and vanilla extract until the mixture is smooth and creamy. This step is essential because well-creamed butter incorporates air, helping the cookies to bake up with a light texture. Add the egg yolk next and mix it in fully, scraping down the sides of the bowl to ensure everything combines evenly.
Step 2: Gently Fold in the Flour
Now, gradually add the all-purpose flour to the mixture. You want to mix just until the flour is incorporated to avoid overworking the dough, which could lead to tougher cookies. The dough will start to come together and become soft and manageable.
Step 3: Chill the Dough
Turn the dough onto a lightly floured surface, knead it gently a few times until smooth, then shape it into a log. Wrapping the dough in plastic wrap and chilling it for several hours is crucial—this rest allows the butter to firm up, making the dough easier to slice and helping the cookies keep their shape during baking. Alternatively, you can freeze the dough if you want to prepare in advance.
Step 4: Prepare Your Oven and Baking Sheets
Preheat your oven to 325°F (160°C) and line baking sheets with parchment paper. Using parchment prevents sticking and promotes even baking, giving your cookies a beautiful golden edge without burning.
Step 5: Slice and Arrange the Cookies
Once the dough is well-chilled, slice it into 1/8-inch thick rounds using a sharp knife. Laying the slices one inch apart on the baking sheets ensures they have space to expand slightly without merging.
Step 6: Bake Until Edges Turn Golden
Bake the cookies for 16 to 18 minutes or just until their edges start turning golden. It’s important not to overbake—these cookies should remain tender inside with a slight crisp on the outside. After baking, transfer the cookies to a wire rack to cool completely before enjoying.
How to Serve Butter Cookies Recipe
Garnishes
While these butter cookies are delicious on their own, you can add a little flair by garnishing them with a light dusting of powdered sugar or dipping half the cookie in melted chocolate for an elegant touch. A sprinkle of finely chopped nuts or colorful sprinkles before baking adds texture and visual appeal, turning a humble cookie into a conversation starter.
Side Dishes
Butter cookies pair wonderfully with hot beverages like tea, coffee, or cocoa, making them perfect companions for an afternoon break or breakfast treat. You can also serve them alongside fresh fruit or a dollop of whipped cream for a simple yet satisfying dessert plate.
Creative Ways to Present
For festive occasions, arrange your butter cookies in a beautiful tin or a glass jar lined with parchment paper for a gift that feels homemade and luxurious. Stacking them between layers of wax paper keeps them from sticking together, and adding a ribbon or personalized tag makes it extra special.
Make Ahead and Storage
Storing Leftovers
Store your leftover butter cookies in an airtight container at room temperature to maintain their tender, crisp texture. They will keep beautifully for up to a week, making it easy to enjoy a treat whenever you crave.
Freezing
If you want to make a batch ahead of time, you can freeze either the dough or the baked cookies. Wrap the dough log tightly in plastic before freezing, thaw it in the fridge before slicing and baking. Baked cookies can be frozen in a sealed container with parchment paper between layers and will stay fresh for up to three months.
Reheating
To refresh your butter cookies after storage, warm them in a preheated oven at 300°F (150°C) for about 5 minutes. This will help revive their just-baked crispness and bring back the lovely aroma, making them taste freshly made.
FAQs
Can I use salted butter instead of unsalted?
Yes, you can use salted butter, but reduce or omit the added salt in the recipe to avoid an overly salty cookie.
What can I substitute for all-purpose flour?
While all-purpose flour gives the best texture, you can try a pastry flour for a more delicate crumb, but avoid using whole wheat or self-rising flour as it changes the texture and rise.
Why do I need to chill the dough?
Chilling firms up the butter in the dough, making it easier to slice and helps the cookies hold their shape instead of spreading too much during baking.
Can I make these cookies without an egg yolk?
The egg yolk adds richness and helps bind the dough. Removing it may affect texture and flavor, but you could experiment with substitutes like an extra tablespoon of butter or yogurt.
How long will these cookies stay fresh?
Properly stored in an airtight container, your butter cookies will stay fresh and delicious for up to one week at room temperature.
Final Thoughts
There’s something truly comforting about baking a batch of buttery, golden cookies from scratch, and this Butter Cookies Recipe captures that feeling perfectly. With a few simple ingredients and straightforward steps, you can create little bites of joy that bring smiles to any table. I can’t wait for you to try this recipe and discover how easy and delightful homemade butter cookies can be!
Print
Butter Cookies Recipe
- Prep Time: 20 minutes
- Cook Time: 16-18 minutes
- Total Time: 36-38 minutes (excluding chilling time)
- Yield: 24 cookies
- Category: Baking
- Method: Baking
- Cuisine: American
- Diet: Vegetarian
Description
Classic butter cookies that are crisp, buttery, and perfectly golden. These cookies are simple to make with basic pantry ingredients and are ideal for tea time, holidays, or anytime you crave a buttery, delicate cookie.
Ingredients
Cookie Dough:
- 8 oz unsalted butter, softened
- 3/4 cup granulated sugar
- 1/4 tsp salt
- 1 1/2 tsp pure vanilla extract
- 1 large egg yolk
- 2 cups all-purpose flour
Instructions
- Mix Butter and Sugar: Beat the softened butter, granulated sugar, salt, and vanilla extract together until the mixture is smooth and creamy. This step ensures the sugar is well incorporated and the butter is fluffy.
- Add Egg Yolk: Add one large egg yolk to the butter mixture and mix thoroughly until fully incorporated. Scrape down the sides of the bowl as needed to mix evenly.
- Incorporate Flour: Gradually add the 2 cups of all-purpose flour into the wet mixture, mixing just until the dough comes together and there are no visible streaks of flour.
- Shape and Chill Dough: Turn the dough out onto a lightly floured surface. Knead it a few times until smooth. Shape the dough into a log, wrap it tightly with plastic wrap, and refrigerate for several hours or freeze for later use. Chilling firms the dough, making it easier to slice thinly.
- Preheat Oven and Prepare Sheet: Preheat your oven to 325°F (160°C). Line baking sheets with parchment paper to prevent sticking and promote even baking.
- Slice and Bake: Remove chilled dough from the refrigerator. Slice the dough log into 1/8-inch thick rounds with a sharp knife. Place slices about 1 inch apart on the prepared baking sheets. Bake in the preheated oven for 16 to 18 minutes, or until the edges just begin to turn golden brown.
- Cool and Serve: After baking, transfer the cookies to a cooling rack to cool completely. This helps them firm up and reach perfect crispness before serving.
Notes
- For easier slicing, warm the knife slightly or sprinkle it with flour to prevent sticking.
- You can freeze the dough log for up to 1 month; thaw before slicing and baking.
- These cookies keep well stored in an airtight container for up to one week.
- Optionally, sprinkle a little sugar on top of each cookie before baking for extra sparkle and sweetness.


