If you’ve been searching for a fun, refreshing treat that’s both indulgent and simple to make, the Chocolate Covered Banana Pops Recipe is your new best friend. These delightful frozen snacks combine the natural sweetness and creaminess of ripe bananas with a crunchy, chocolatey exterior and all the fun toppings you can dream up. Perfect for a sunny afternoon or an anytime dessert fix, this recipe brings together wholesome ingredients and pure joy in each bite. Trust me, once you try making these at home, they’ll be a household favorite for good!
Ingredients You’ll Need
Getting ready to whip up these Chocolate Covered Banana Pops is a breeze thanks to a handful of straightforward ingredients, each playing a crucial role in making the pops irresistibly tasty and texturally delightful.
- 6 ripe bananas: Look for bananas with some spots but still firm to ensure the perfect creamy texture once frozen.
- 8 ounces (225 g) chopped high-quality vegan chocolate: Using good chocolate makes all the difference in flavor and smoothness.
- 1 1/2 tablespoons refined coconut oil: This helps the chocolate melt beautifully and achieve that perfect shiny coating.
- Chopped peanuts: Add a satisfying crunch and a hint of saltiness.
- Shredded coconut: Brings a touch of tropical sweetness and texture.
- Granola: Adds extra crunch and a wholesome touch.
- Cacao nibs: For an intense chocolate crunch and a little bitterness that balances the sweetness.
- Flaky salt: Just a pinch enhances all the flavors and contrasts the sweetness beautifully.
How to Make Chocolate Covered Banana Pops Recipe
Step 1: Prep Your Bananas
Begin by lining a baking sheet with parchment paper to keep your pops from sticking later on. Peel your ripe bananas and slice each one in half. Carefully insert a popsicle stick or wooden skewer into the cut side of each banana half—this will be your handy handle! Place them spaced out on the sheet and pop them into the freezer. The key here is patience: freeze your bananas for at least 4 hours or up to two days. This gives you the perfect frozen base that holds up to the chocolate dip without melting too quickly.
Step 2: Melt the Chocolate
Melting chocolate can feel like an art, but it’s actually quite simple. Choose your preferred method—a double boiler or microwave. If you go the microwave route, place your chopped chocolate and refined coconut oil in a microwave-safe bowl, heat for 60 seconds, then stir well every 20 seconds until fully melted and smooth. For the double boiler method, place a glass bowl over simmering water and gently melt the chocolate and coconut oil together, stirring frequently for that luscious sheen.
Step 3: Dunk and Decorate
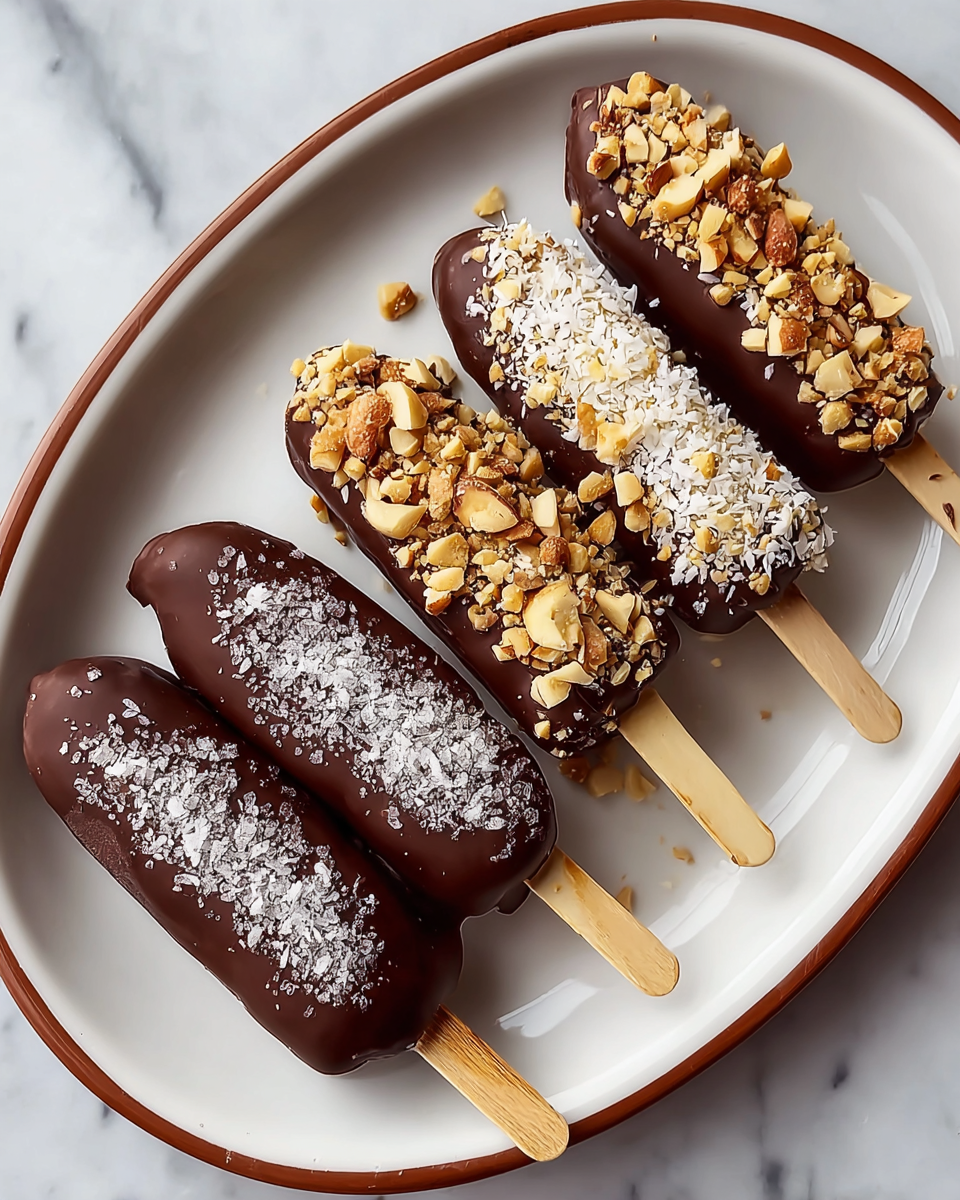
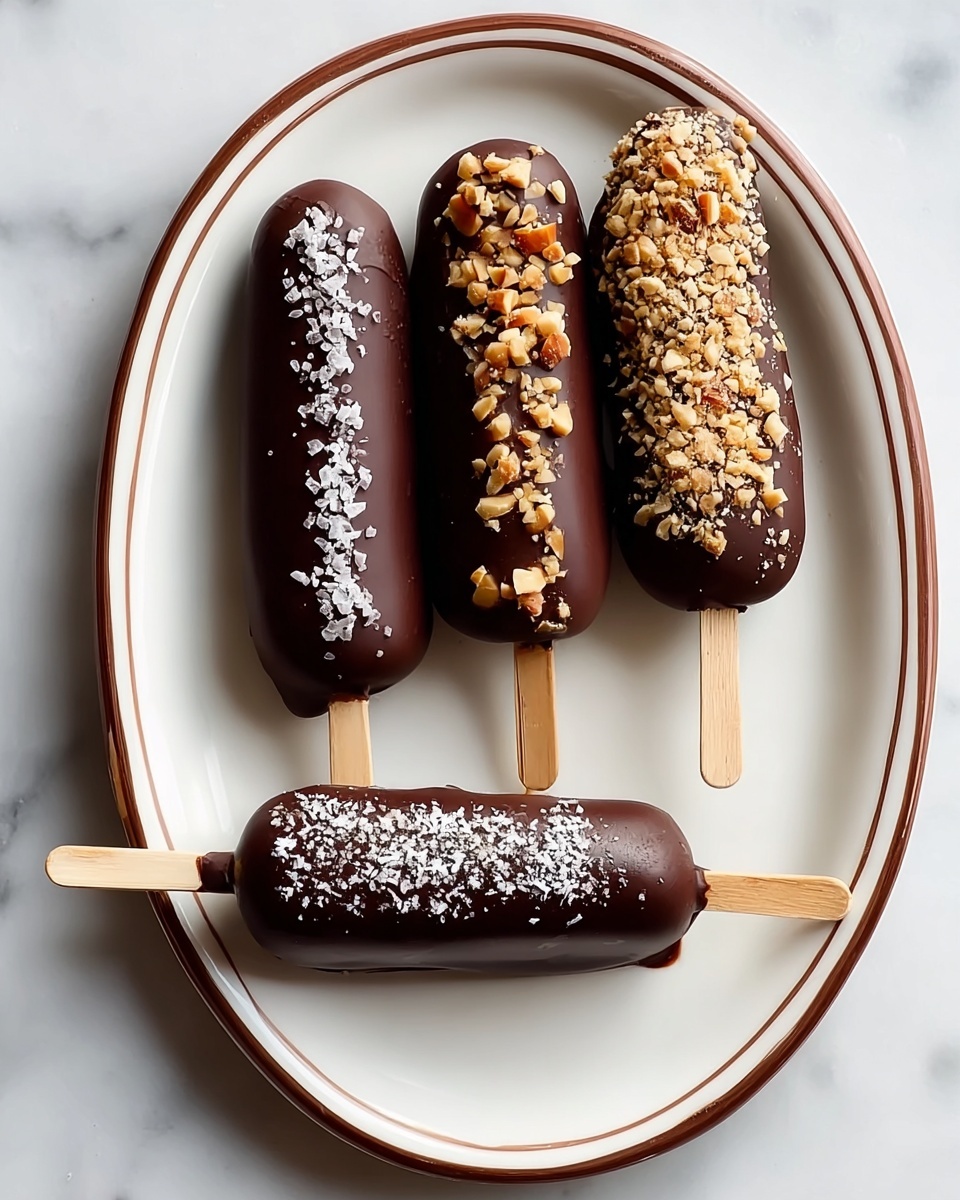
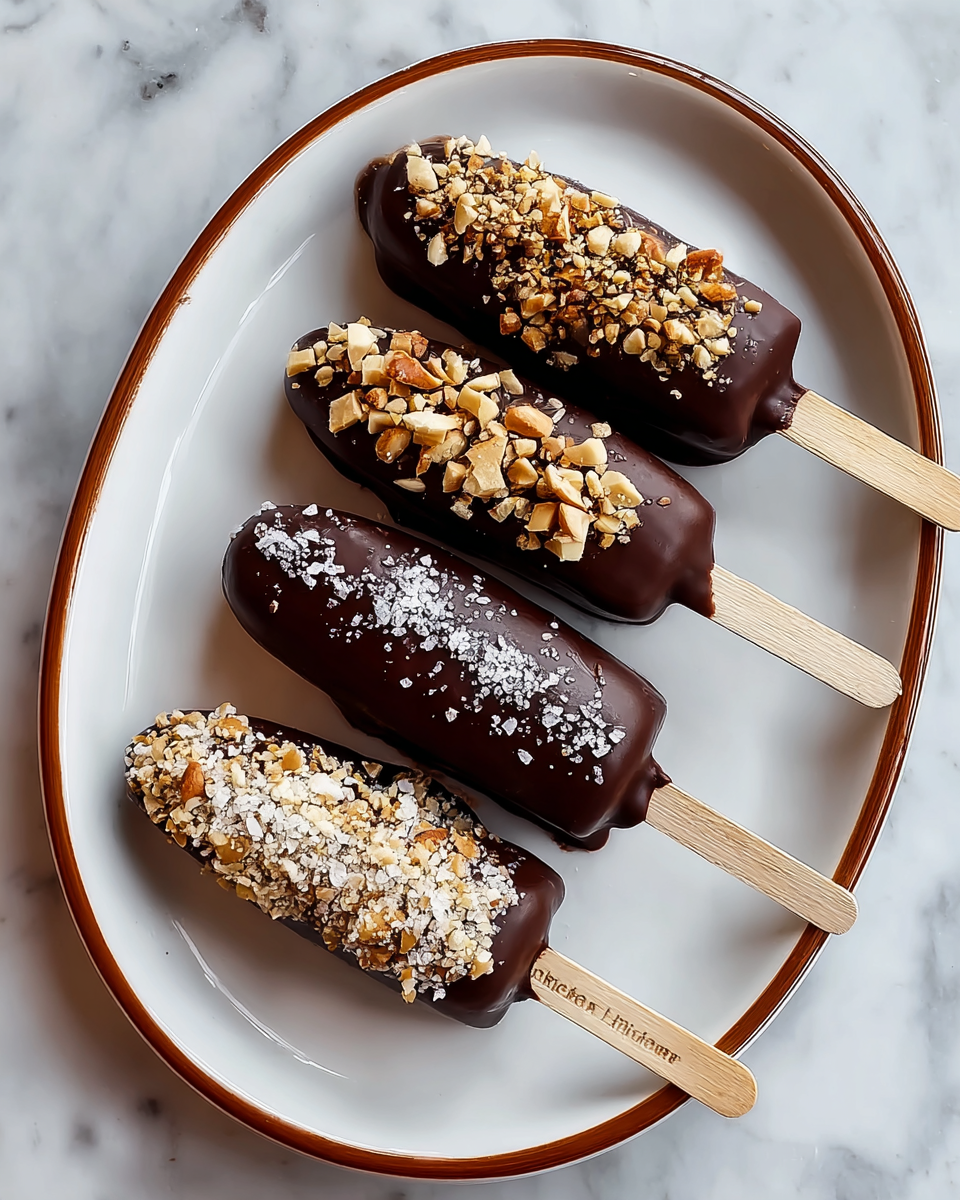
Once your bananas are frozen solid and your chocolate is silky smooth, it’s time for the fun part. Remove your banana pops from the freezer and one by one, dunk them into the melted chocolate, letting the excess drip off like a pro. While the chocolate is still wet, sprinkle your favorite toppings—think chopped peanuts, shredded coconut, granola, cacao nibs, and a pinch of flaky salt. Each topping adds a unique character to every bite, exploding with flavors and textures.
Step 4: Final Freeze and Serve
After coating and decorating, lay the banana pops back down on the parchment-lined baking sheet. Pop them back into the freezer for at least 15 minutes to let the chocolate harden into that perfectly crisp shell. Then they’re ready to enjoy immediately or saved for later snacking.
How to Serve Chocolate Covered Banana Pops Recipe
Garnishes
Don’t stop at just a basic coating—garnishing these banana pops elevates both their look and flavor. Try a mix of crunchy chopped peanuts for a salty crunch, or shredded coconut for a tropical vibe. If you want a bit of a superfood twist, cacao nibs are your friend. A sprinkle of flaky salt on the final product always makes the chocolate and banana flavors pop even more vividly.
Side Dishes
These pops can stand on their own, but if you’re setting a dessert table, pair them with fresh berries or a zesty fruit salad to balance the rich chocolate with fresh acidity. A light drizzle of vegan caramel sauce or a small bowl of dairy-free yogurt can also complement the pops beautifully, adding layers of flavor and richness without overpowering that banana goodness.
Creative Ways to Present
Presentation matters, especially for a fun treat like this. Arrange your Chocolate Covered Banana Pops Recipe on a colorful platter lined with small edible flowers or mint leaves for a vibrant pop. For parties, serve them upright in a tall glass filled with crushed ice or granola so they look like popsicle bouquets. Wrapping each pop in wax paper tied with a ribbon makes for a charming homemade gift or take-home favor.
Make Ahead and Storage
Storing Leftovers
If you have any pops left after the initial party or snack attack, no worries—just keep them in an airtight container in the freezer. This prevents freezer burn and keeps them tasting fresh and chocolatey for up to a week. Make sure to separate layers with parchment paper so they don’t stick together.
Freezing
These pops actually improve in texture if left frozen for a few hours before serving. The longer frozen, the firmer and more satisfying the bite. Just remember to keep them well-covered and airtight to avoid that dry freezer taste.
Reheating
Reheating isn’t really necessary or recommended for these pops since they’re best enjoyed cold and crisp. If the chocolate shell softens a bit, just let them sit at room temperature for a few minutes, or give them a quick blast in the freezer to firm up again before digging in.
FAQs
Can I use regular dairy chocolate instead of vegan chocolate?
Absolutely! While the recipe calls for vegan chocolate, regular milk or dark chocolate works just as well if you’re not avoiding dairy. Just be sure it’s high-quality for the best taste and smooth texture.
What if my bananas are too ripe and mushy?
If your bananas are soft and overly ripe, they might be tricky to work with because they can become mushy when frozen and dipped. Try to pick bananas that have some spots but are still firm enough to hold their shape once frozen.
Can I add other toppings besides the ones listed?
Definitely! This recipe is a playground for creativity. Think chopped nuts like almonds or pistachios, colorful sprinkles, crushed cookies, or even a drizzle of peanut butter for an extra indulgence.
How long do frozen Chocolate Covered Banana Pops last?
When properly stored in an airtight container, these pops last up to one week in the freezer without losing their flavor or texture, making them a great make-ahead treat.
Is refined coconut oil necessary?
Refined coconut oil is preferred because it has a neutral flavor and helps the chocolate set smoothly. If you only have unrefined coconut oil, it will still work but might impart a slight coconut taste.
Final Thoughts
There’s something genuinely joyful about making and sharing the Chocolate Covered Banana Pops Recipe. It’s a simple dessert that feels festive, healthy, and indulgent all at once—perfect for family gatherings, kids’ parties, or a sweet afternoon pick-me-up. So don’t hesitate, grab those bananas, melt that chocolate, and have a blast creating these irresistible frozen treats. Your taste buds will thank you!
Print
Chocolate Covered Banana Pops Recipe
- Prep Time: 15 minutes
- Cook Time: 5 minutes
- Total Time: 20 minutes plus freezing time
- Yield: 12 banana pops
- Category: Dessert
- Method: No-Cook
- Cuisine: American
- Diet: Vegan
Description
Delight in these irresistible Chocolate Covered Banana Pops, featuring ripe bananas dipped in rich vegan chocolate and topped with your choice of nuts, shredded coconut, granola, cacao nibs, and flaky salt. Perfect as a refreshing, easy-to-make frozen treat for all ages.
Ingredients
Banana Pops
- 6 ripe bananas (with some spots but still firm)
Chocolate Coating
- 8 ounces (225 g) chopped high-quality vegan chocolate
- 1 1/2 tablespoons refined coconut oil
Toppings (optional)
- Chopped peanuts
- Shredded coconut
- Granola
- Cacao nibs
- Flaky salt
Instructions
- Prep: Line a baking sheet with parchment paper. Peel the bananas and cut each into halves. Insert a popsicle stick or wooden skewer into the cut side of every banana half to create banana pops.
- Freeze: Place the prepared banana pops spaced apart on the lined baking sheet. Freeze them for at least 4 hours or up to 2 days in advance to ensure they are solid and ready for coating.
- Melt the Chocolate: Choose your preferred melting method – microwave or double boiler – to melt the chocolate with the coconut oil.
- Microwave Method: Place the chopped vegan chocolate and refined coconut oil in a microwave-safe bowl. Microwave on high for 60 seconds, then stir well. Continue microwaving in 20-second bursts, stirring after each, until the chocolate is completely melted and smooth.
- Double Boiler Method: Fill a saucepan with simmering water and place a heatproof glass bowl on top, making sure it doesn’t touch the water. Add the chocolate and coconut oil to the bowl and stir frequently until melted and smooth.
- Dunk & Decorate: Remove frozen banana pops from the freezer. Dip each pop into the melted chocolate, ensuring it is fully coated. Allow excess chocolate to drip off. Immediately sprinkle your choice of chopped peanuts, shredded coconut, granola, cacao nibs, or flaky salt over the chocolate before it sets.
- Serve: Enjoy the chocolate covered banana pops immediately or store them in the freezer for a cold treat later. They are best enjoyed chilled and fresh.
Notes
- Use ripe bananas with spots but still firm for the best texture and sweetness.
- If you want smoother chocolate, use refined coconut oil to avoid coconut flavor.
- You can customize toppings or skip them for a clean chocolate coating.
- Store leftover banana pops in an airtight container in the freezer for up to 2 days for optimal freshness.
- If chocolate starts to harden while dipping, gently remelt it using your chosen method.
