
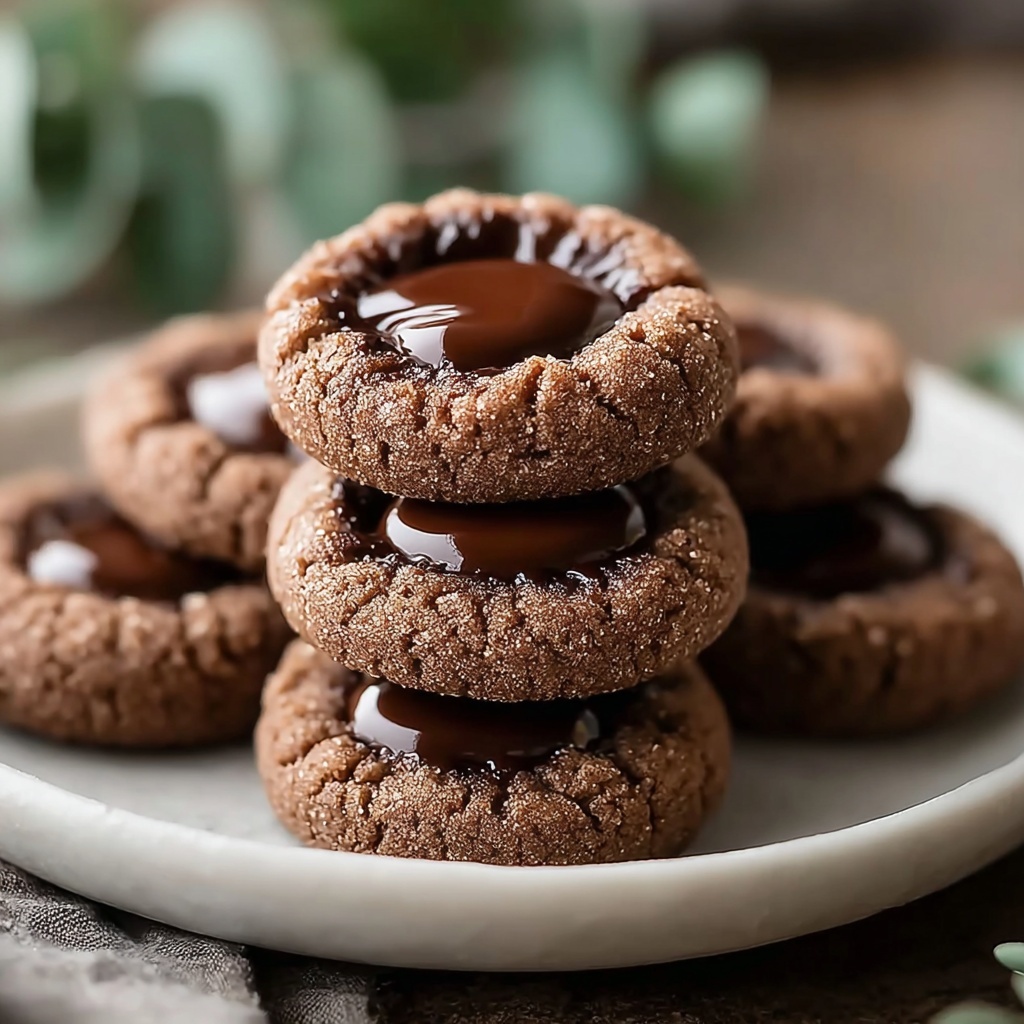
If you are on the lookout for a delightful treat that perfectly balances nutty richness with chocolatey goodness, look no further than this Chocolate Hazelnut Thumbprint Cookies Recipe. These cookies are tender and buttery with a crisp edge, while the signature thumbprint filled with luscious chocolate hazelnut spread takes every bite to a decadent new level. It’s a recipe that brings together familiar ingredients in a way that feels both comforting and special, making it a standout favorite to bake again and again.
Ingredients You’ll Need
The beauty of this Chocolate Hazelnut Thumbprint Cookies Recipe lies in its simplicity. You’ll find that each ingredient plays a unique role—some add sweetness, others provide texture or flavor depth, and together they craft a cookie that’s irresistible.
- Unsalted butter (1 cup or 2 sticks): The base of the dough, giving the cookies a tender crumb and rich flavor.
- Granulated sugar (1/2 cup): Adds sweetness and a hint of crunch to the cookie edges.
- Light brown sugar (1/2 cup, packed): Brings moisture and a subtle caramel note that deepens the flavor.
- Large egg yolk (1): Adds richness and helps bind the dough together for the ideal texture.
- Vanilla extract (1 tsp): Enhances the overall flavor with a warm, aromatic touch.
- All-purpose flour (2 cups): Provides structure, ensuring the cookies hold their shape perfectly.
- Salt (1/2 tsp): Balances the sweetness and brightens all the flavors.
- Finely chopped hazelnuts (1/2 cup): Infuse nutty crunch and authenticity—ground hazelnuts also work well if you prefer a smoother texture.
- Chocolate hazelnut spread (1/2 cup): The star filling, adding creamy decadence to each thumbprint.
How to Make Chocolate Hazelnut Thumbprint Cookies Recipe
Step 1: Prepare Your Oven and Baking Sheets
Preheat your oven to 350°F (175°C). Line two baking sheets with parchment paper or silicone mats to prevent sticking and help the cookies bake evenly. This sets the stage for perfectly shaped thumbprint cookies.
Step 2: Cream the Butter and Sugars
In a large mixing bowl, beat the softened butter with granulated sugar and light brown sugar until the mixture is light and fluffy, which should take about 2-3 minutes with an electric mixer. This step is crucial as it creates air pockets that contribute to a tender texture. Then incorporate the egg yolk and vanilla extract until everything is combined smoothly.
Step 3: Combine the Dry Ingredients
In a separate bowl, whisk together the all-purpose flour, salt, and finely chopped hazelnuts. Mixing these dry ingredients thoroughly ensures even distribution of flavor and structure in your dough.
Step 4: Bring Wet and Dry Ingredients Together
Gradually add the dry mixture to the butter mixture, folding gently until just combined. Avoid overmixing here to keep your cookies tender rather than tough.
Step 5: Shape the Dough Into Balls
Roll the cookie dough into 1-inch balls, which will give you bite-sized treats that are evenly sized for consistent baking. Arrange them about 2 inches apart on the prepared baking sheets so they can spread without merging.
Step 6: Create the Thumbprints
Using your thumb or the back of a small spoon, gently press into the center of each dough ball to make an indentation. This classic thumbprint is where all the magic happens, holding that luscious filling.
Step 7: Bake Until Lightly Golden
Place the trays in your preheated oven and bake for around 10 to 12 minutes. You’ll want to see lightly golden edges while the centers remain soft—a perfect balance between crisp and chewy.
Step 8: Re-Indent and Cool
Once out of the oven, the centers might have puffed up a bit, so press gently again to re-form the indentations. Let the cookies rest on the baking sheet for 5-10 minutes before moving them to a wire rack to cool completely. This allows the cookies to set without breaking.
Step 9: Fill with Chocolate Hazelnut Spread
When the cookies are cool, spoon or pipe a dollop of chocolate hazelnut spread into each thumbprint. The creamy filling adds an irresistible richness that complements the nutty cookies beautifully.
Step 10: Let the Filling Set
Allow the spread to firm up slightly before serving to avoid any messy spillover and to give that luscious, satisfying bite.
How to Serve Chocolate Hazelnut Thumbprint Cookies Recipe

Garnishes
Enhance your cookies by sprinkling a pinch of sea salt flakes on top of the chocolate spread before it sets. You can also dust lightly with powdered sugar or even add a few extra chopped toasted hazelnuts for extra crunch and beauty.
Side Dishes
These thumbprint cookies pair wonderfully with a cup of freshly brewed coffee or your favorite tea. For an indulgent twist, serve alongside a small scoop of vanilla ice cream or a glass of cold milk to balance the rich chocolate and nut flavors.
Creative Ways to Present
Try arranging the cookies on a platter lined with parchment and accented by sprigs of fresh mint or edible flowers for a festive touch. For gifting, stack them in a clear jar or decorative tin tied with a ribbon—sharing this Chocolate Hazelnut Thumbprint Cookies Recipe is sure to make someone’s day brighter.
Make Ahead and Storage
Storing Leftovers
Keep your leftover cookies fresh by placing them in an airtight container at room temperature. They will stay delicious for up to five days, allowing you to enjoy your baking efforts across the week without losing their delightful texture.
Freezing
If you want to prepare them in advance, freeze the unbaked dough balls on a sheet tray until solid, then transfer to a freezer-safe bag. When ready to bake, just add a couple minutes to your baking time. Baked cookies can also be frozen in an airtight container for up to two months—just thaw at room temperature before adding the chocolate spread.
Reheating
To bring back that fresh-from-the-oven warmth, pop your cookies in a low 300°F oven for 5 minutes or microwave briefly in 10-second bursts. Add fresh chocolate hazelnut spread afterward to recreate the freshly assembled experience.
FAQs
Can I use roasted hazelnuts instead of raw?
Absolutely! Roasted hazelnuts bring out more intense flavors and a deeper aroma, which would only elevate the deliciousness of this Chocolate Hazelnut Thumbprint Cookies Recipe.
What if I don’t have chocolate hazelnut spread?
You can substitute with your favorite chocolate spread, jam, or even caramel. Though chocolate hazelnut spread is classic, feel free to get creative with the filling.
How do I prevent the cookies from spreading too much?
Make sure your butter is softened but not melted before mixing, and chill the dough for about 30 minutes if it feels too soft. This helps control spreading and keeps your thumbprints perfectly shaped.
Can this recipe be made gluten-free?
Yes! Swap out the all-purpose flour for a gluten-free baking blend that measures cup-for-cup the same. The texture might vary slightly, but the nutty and chocolate flavors will shine through beautifully.
Is it necessary to re-indent the cookies after baking?
Re-indenting ensures the thumbprint is deep enough to hold the chocolate hazelnut spread without overflow, making for a neat, appealing cookie that’s easier to fill and eat.
Final Thoughts
This Chocolate Hazelnut Thumbprint Cookies Recipe is truly a crowd-pleaser that brings simple ingredients together into a show-stopping treat. Whether you’re baking for family, friends, or just to satisfy your own sweet tooth, these cookies offer a little bit of joy in every bite. I encourage you to try making them for your next cozy afternoon or special occasion—once you do, they’re sure to become a beloved classic in your cookie jar.
Print
Chocolate Hazelnut Thumbprint Cookies Recipe
- Prep Time: 15 minutes
- Cook Time: 12 minutes
- Total Time: 27 minutes
- Yield: 24 cookies
- Category: Dessert
- Method: Baking
- Cuisine: American
Description
Delight in these classic Chocolate Hazelnut Thumbprint Cookies featuring a buttery, tender base studded with finely chopped hazelnuts and filled with rich chocolate hazelnut spread. Perfectly baked until golden with a soft center, these cookies offer a satisfying combination of crunch, sweetness, and creamy chocolate in every bite.
Ingredients
Cookie Dough
- 1 cup (2 sticks) unsalted butter, softened
- 1/2 cup granulated sugar
- 1/2 cup packed light brown sugar
- 1 large egg yolk
- 1 tsp vanilla extract
- 2 cups all-purpose flour
- 1/2 tsp salt
- 1/2 cup finely chopped hazelnuts (or ground hazelnuts)
Filling
- 1/2 cup chocolate hazelnut spread (like Nutella)
Instructions
- Preheat Oven: Preheat your oven to 350°F (175°C) and line two baking sheets with parchment paper or silicone baking mats to prepare for baking.
- Mix Wet Ingredients: In a large mixing bowl, beat the softened butter with granulated sugar and light brown sugar until the mixture is light and fluffy. Then add the egg yolk and vanilla extract, mixing until well combined.
- Prepare Dry Ingredients: In a separate bowl, whisk together the all-purpose flour, salt, and finely chopped hazelnuts to combine evenly.
- Combine Dough: Gradually add the dry ingredients to the wet ingredients, mixing just until combined to avoid overworking the dough.
- Shape Dough Balls: Roll the dough into 1-inch balls and place them about 2 inches apart on the prepared baking sheets.
- Create Thumbprints: Using your thumb or the back of a small spoon, gently press an indentation into the center of each dough ball to create space for filling.
- Bake Cookies: Bake in the preheated oven for 10-12 minutes, or until the edges turn lightly golden, indicating doneness.
- Re-indent and Cool: Remove the cookies from the oven and while still warm, press the centers again if needed. Allow the cookies to cool on the baking sheets for 5-10 minutes, then transfer to a wire rack to cool completely.
- Add Filling: Once the cookies have fully cooled, spoon or pipe a small amount of chocolate hazelnut spread into the indentation of each cookie.
- Set and Store: Let the chocolate spread set slightly before serving. Store the cookies in an airtight container at room temperature for up to 5 days to maintain freshness.
Notes
- Use softened butter for easier mixing and better cookie texture.
- Do not overmix the dough to keep cookies tender.
- If you prefer a stronger hazelnut flavor, you can toast the hazelnuts lightly before chopping.
- The chocolate hazelnut spread should be at room temperature to make it easier to spoon or pipe.
- You can substitute hazelnuts with other nuts like pecans or almonds if desired.
- Cookies can be stored at room temperature in an airtight container for up to 5 days or frozen for longer storage.


