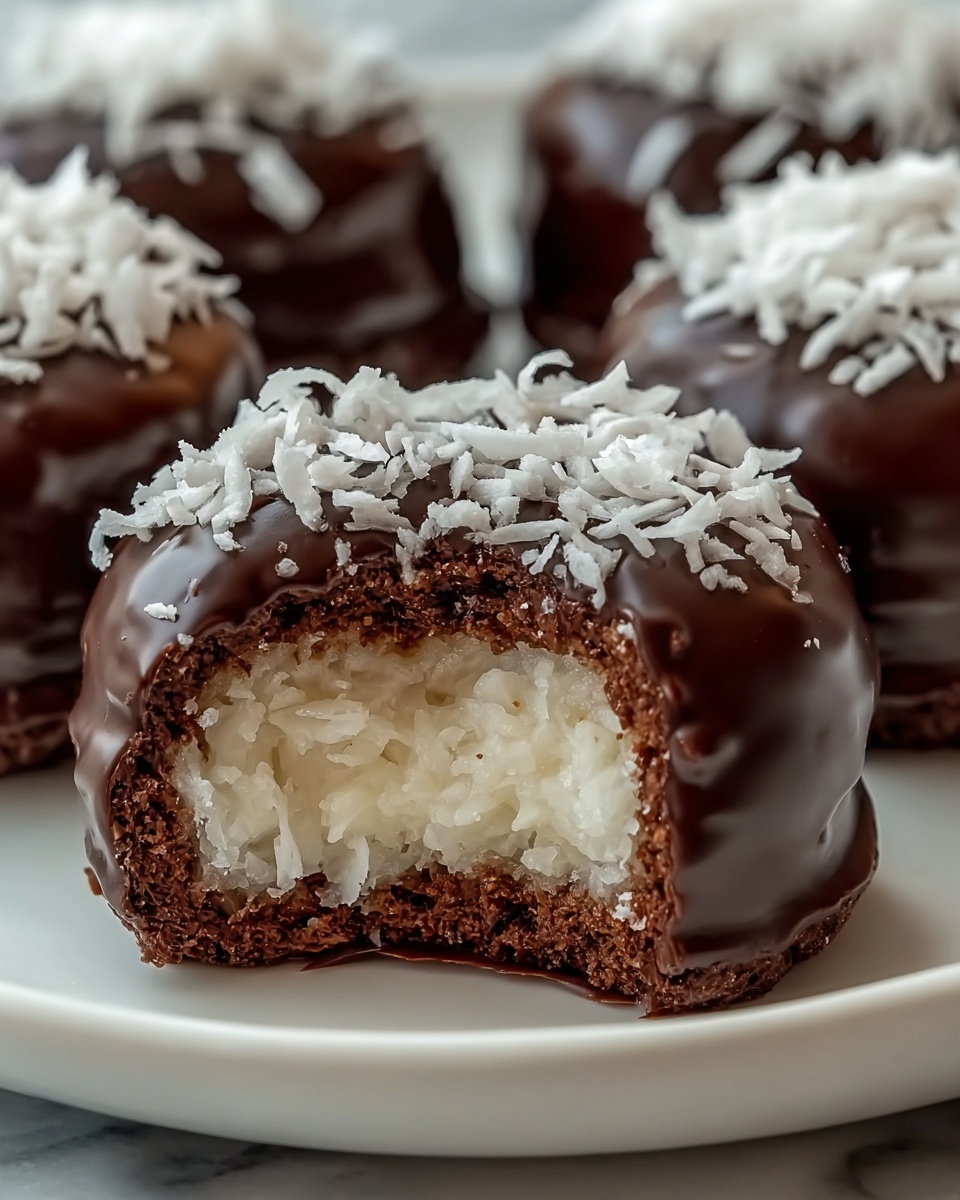
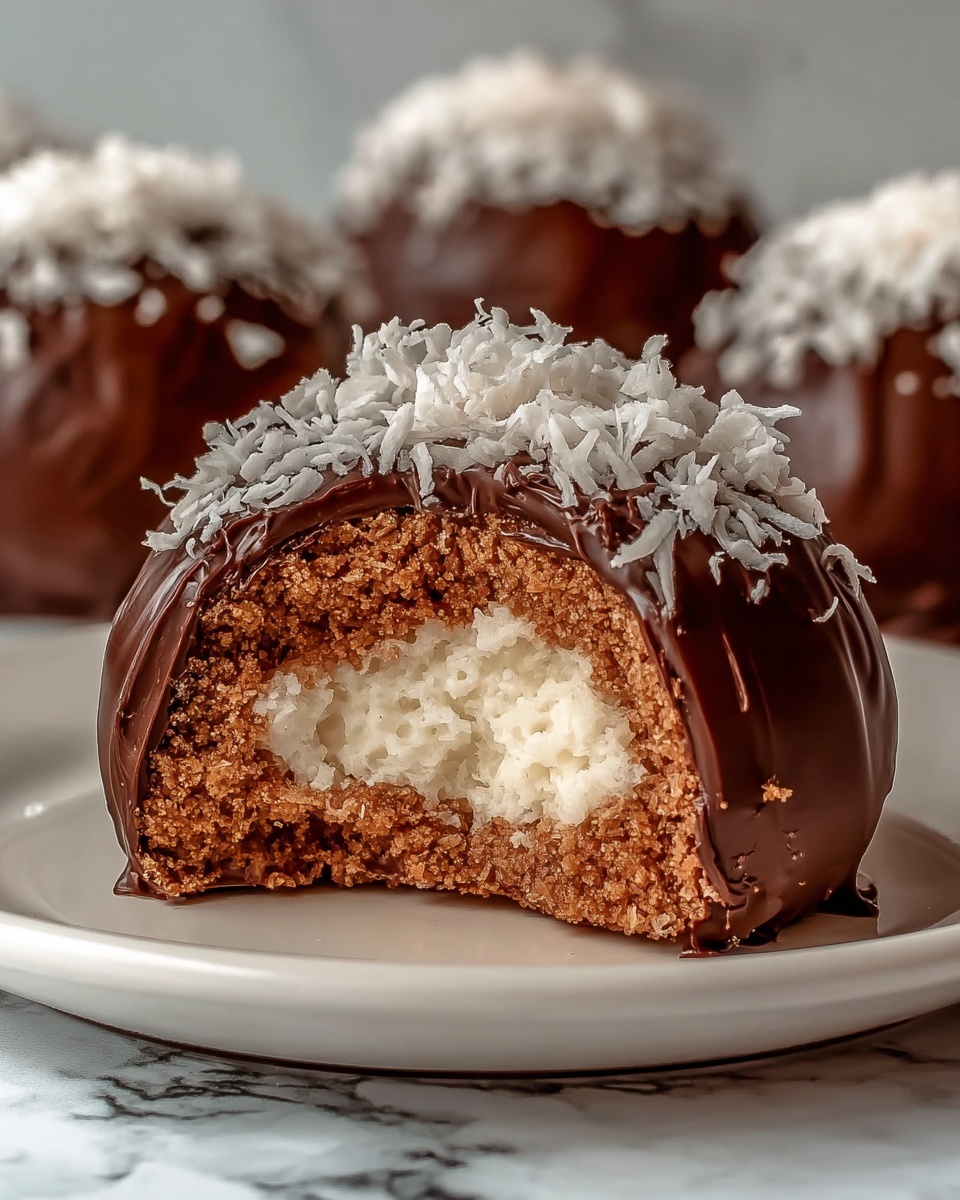
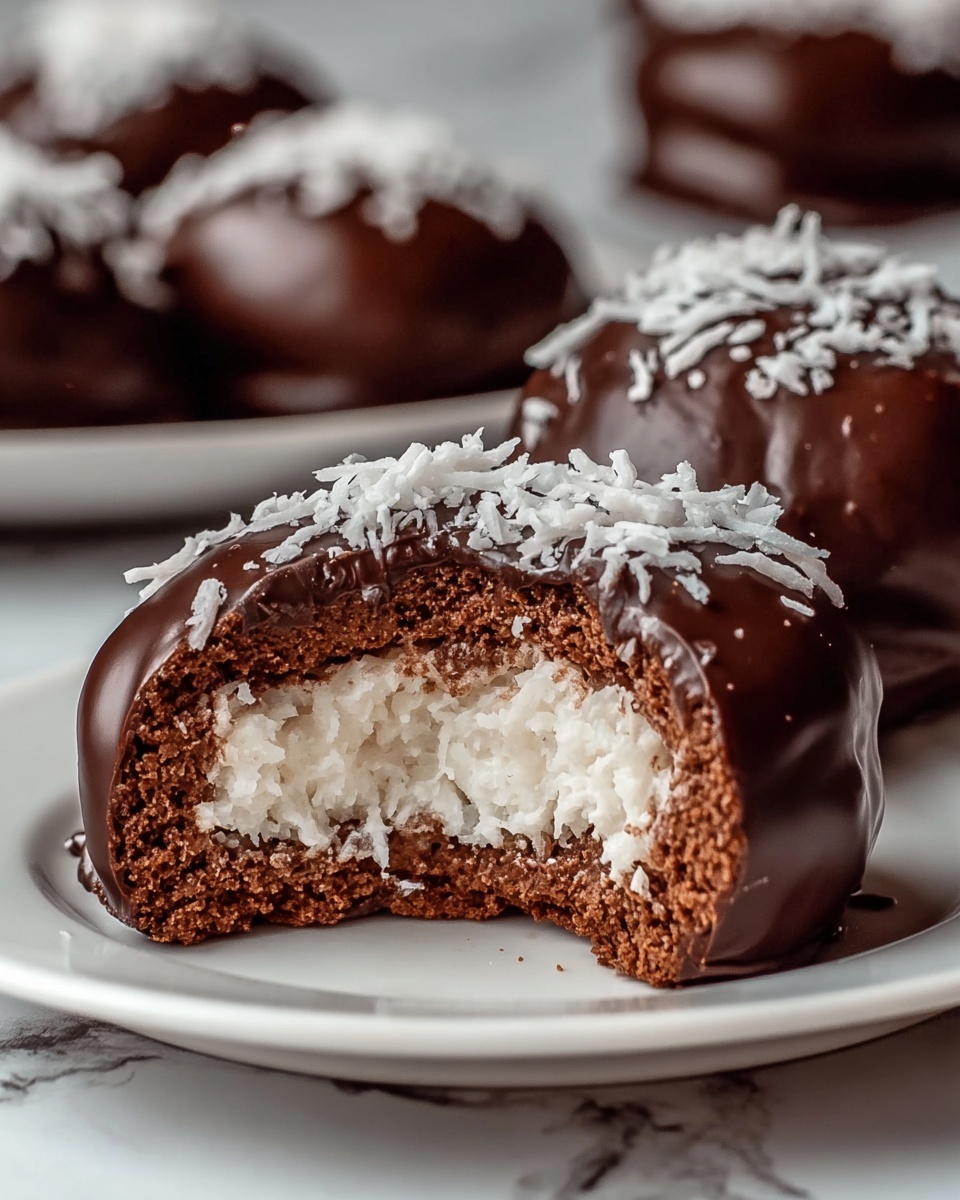
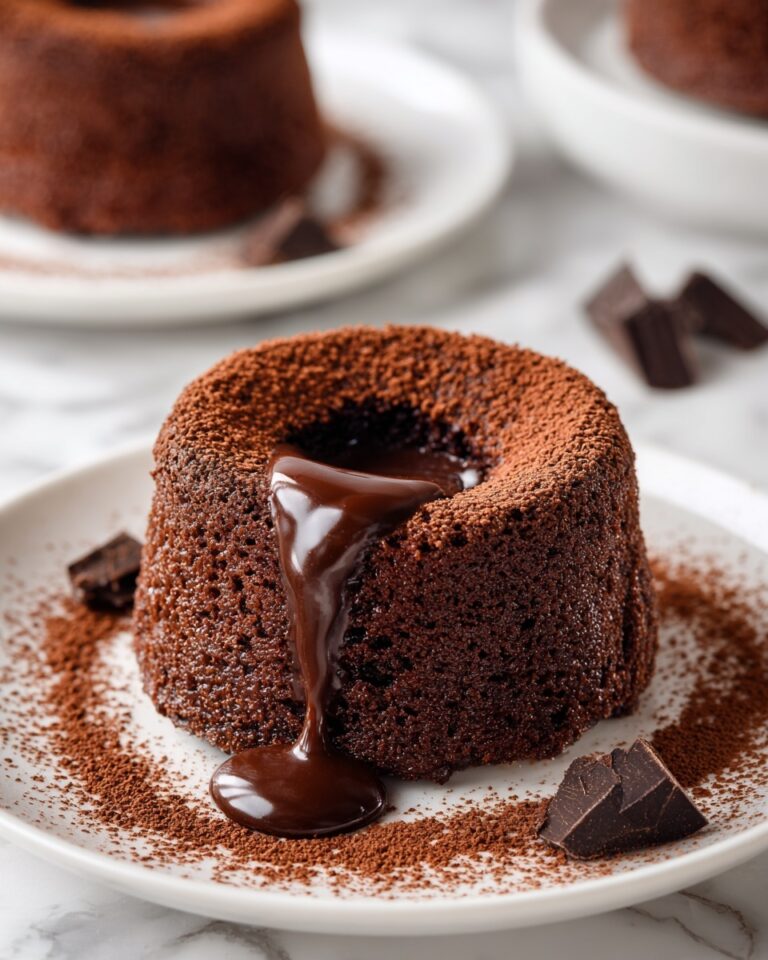
If you love a sweet treat that feels like a tropical escape wrapped in indulgent chocolate, you are going to adore this Coconut Domes with Chocolate Spread Recipe. Imagine soft, chewy coconut centers that melt in your mouth, perfectly paired with rich, velvety chocolate coating and a luscious dollop of chocolate spread nestled inside. It’s a no-bake delight that’s as simple as it is luxurious, making it a fantastic pick for when you want something impressive without fussing over the oven. Every bite is a little moment of joy that’s perfect for sharing with friends or keeping all to yourself.
Ingredients You’ll Need
These ingredients come together effortlessly to transform simple pantry staples into a dessert that tastes like a slice of paradise. Each component plays a vital role: the shredded coconut gives texture and that unmistakable tropical essence, sweetened condensed milk binds everything with creamy sweetness, and chocolate ensures every bite is heavenly.
- 2 cups shredded unsweetened coconut: The star ingredient giving body, chewiness, and natural coconut flavor.
- ½ cup sweetened condensed milk: Adds fabulous sweetness and helps everything stick together perfectly.
- 1 teaspoon vanilla extract: Enhances the overall flavor with warm, inviting notes.
- Pinch of salt: Balances the sweetness and highlights the coconut’s natural taste.
- 4 ounces dark or semi-sweet chocolate (melted): For coating the domes with rich chocolate that’s smooth and glossy.
- ½ cup chocolate spread (such as Nutella or ganache): The decadent surprise inside each dome, adding creamy chocolate depth.
- 1 tablespoon coconut oil (optional): Makes the melted chocolate extra silky and easier to dip or drizzle.
How to Make Coconut Domes with Chocolate Spread Recipe
Step 1: Prepare the Coconut Mixture
Start by combining the shredded coconut, sweetened condensed milk, vanilla extract, and just a pinch of salt in a large bowl. Mix them thoroughly until the mixture becomes sticky and holds together well. This is the base that gives your domes a chewy, rich coconut texture, so make sure everything is well incorporated.
Step 2: Shape the Domes
Using your hands or a silicone half-sphere mold, scoop roughly 2 tablespoons of the coconut mixture and form it into rounded domes. The shaping is key for that elegant look, so don’t be shy about making them smooth and compact. Place each dome on a parchment-lined tray to keep them from sticking and pop the tray into the freezer for about 30 minutes. This chilling step firms up the domes and makes them easier to coat later.
Step 3: Melt the Chocolate
While your domes are chilling, melt the dark or semi-sweet chocolate. If you opt to use coconut oil, add it now to create a smoother, shinier coating that will set beautifully. You want the chocolate melted to just the right consistency—not too thick or it will be hard to coat evenly.
Step 4: Add Chocolate Spread and Coat
Once chilled, take the domes out and spoon a small dollop of chocolate spread onto the base of each one. This luscious middle layer is what truly sets this dessert apart. Then, carefully dip or drizzle the melted chocolate over the tops of the domes, creating a glossy exterior. This step transforms simple coconut bites into elegant, chocolate-covered treasures.
Step 5: Chill Until Set
Return your chocolate-coated domes to the tray and chill them in the refrigerator for 15 to 20 minutes until the chocolate hardens. This final rest ensures each Coconut Dome with Chocolate Spread Recipe holds its shape and looks as stunning as it tastes.
How to Serve Coconut Domes with Chocolate Spread Recipe
Garnishes
Simple garnishes like a sprinkle of toasted coconut flakes, crushed nuts, or a tiny pinch of flaky sea salt elevate the look and flavor beautifully. They add a bit of texture contrast and a hint of crunch that naturally complements the soft center and silky coating.
Side Dishes
These domes pair wonderfully with a cup of strong coffee or a creamy latte to balance the sweetness. Alternatively, fresh berries or a light fruit salad can add a refreshing note alongside this indulgent treat, making it a balanced dessert experience.
Creative Ways to Present
For a wow factor, arrange your Coconut Domes with Chocolate Spread Recipe on a decorative platter lined with banana leaves or tropical flowers. You could also serve each dome in a mini cupcake liner for easy handling at a party or drizzle extra chocolate over the top right before serving to add flair and extra richness.
Make Ahead and Storage
Storing Leftovers
Keep any leftover domes refrigerated in an airtight container for up to one week. This helps preserve their freshness and keeps the chocolate coating firm yet ready to soften slightly at room temperature.
Freezing
If you want to enjoy these treats later, they freeze beautifully. Place them in a freezer-safe container with parchment layers to keep them from sticking together and freeze for up to one month. When ready to eat, thaw in the fridge overnight for the best texture.
Reheating
Since these are no-bake treats, reheating is not necessary. However, letting frozen domes rest at room temperature for 15 to 20 minutes before serving softens them perfectly for eating and releases all the lovely flavors.
FAQs
Can I use sweetened shredded coconut instead of unsweetened?
Yes, you can substitute sweetened shredded coconut, but because sweetened coconut adds extra sugar, you might want to reduce the amount of sweetened condensed milk slightly to keep the balance right.
Is it possible to make these domes nut-free?
Absolutely! The base recipe does not include nuts, so just avoid adding any nut toppings or using chocolate spreads that contain nuts if allergies are a concern.
Can I replace the sweetened condensed milk with a vegan alternative?
Yes, there are vegan sweetened condensed milk options made from coconut or other plant-based milks. These work well to keep the chewy texture and sweetness for a dairy-free version.
What type of chocolate spread works best?
Classic hazelnut spreads like Nutella are delicious, but you can also opt for homemade ganache or dairy-free alternatives depending on your preferences and dietary needs.
How do I prevent the domes from melting quickly once coated?
Chill them well before serving and keep them refrigerated until just before enjoying to keep the chocolate coating firm and intact.
Final Thoughts
There is something truly magical about the combination of coconut and chocolate in these Coconut Domes with Chocolate Spread Recipe. They’re easy to make but feel special enough to celebrate any occasion. Whether it’s a cozy night in or a festive gathering, these little domes will steal the show and win hearts with their irresistible texture and taste. Give this recipe a try and let a tropical treasure brighten your dessert table.
Print
Coconut Domes with Chocolate Spread Recipe
- Prep Time: 20 minutes
- Cook Time: 0 minutes
- Total Time: 50 minutes
- Yield: 10 domes
- Category: Dessert
- Method: No-Cook
- Cuisine: American
- Diet: Vegetarian, Gluten Free
Description
These Coconut Domes with Chocolate Spread are a delightful no-bake dessert featuring shredded unsweetened coconut bound with sweetened condensed milk, shaped into domes, and coated with rich melted dark chocolate and a luscious chocolate spread base. Perfectly creamy and chewy with a smooth chocolate topping, they make an easy and elegant treat that’s both gluten-free and vegetarian.
Ingredients
Coconut Dome Base
- 2 cups shredded unsweetened coconut
- ½ cup sweetened condensed milk
- 1 teaspoon vanilla extract
- Pinch of salt
Chocolate Coating
- 4 ounces dark or semi-sweet chocolate, melted
- ½ cup chocolate spread (such as Nutella or ganache)
- 1 tablespoon coconut oil (optional, for smoother chocolate coating)
Instructions
- Prepare the Coconut Mixture: In a large bowl, thoroughly mix the shredded coconut, sweetened condensed milk, vanilla extract, and a pinch of salt until the mixture becomes fully combined and sticky enough to hold shape.
- Shape the Domes: Using your hands or a silicone half-sphere mold, scoop about 2 tablespoons of the coconut mixture and form into dome shapes. Place the domes evenly spaced on a parchment-lined tray to prevent sticking.
- Freeze to Firm: Transfer the tray to the freezer and chill for 30 minutes. This step helps the domes set firmly and makes them easier to handle during coating.
- Melt the Chocolate: While the domes are chilling, gently melt the dark or semi-sweet chocolate together with coconut oil (if using) until smooth and glossy, being careful not to overheat the chocolate.
- Apply Chocolate Spread Base: Remove the domes from the freezer and spoon a small dollop of chocolate spread onto the base of each dome. This creates a rich, creamy layer inside the chocolate coating.
- Coat the Domes: Carefully dip or drizzle each dome with the melted chocolate, covering the top and sides as desired. Return the coated domes to the parchment-lined tray.
- Chill to Set: Place the tray in the refrigerator and chill for 15 to 20 minutes, allowing the chocolate coating to harden completely.
- Serve: Enjoy these coconut chocolate domes chilled or allow them to reach room temperature before serving for a softer texture.
Notes
- Use a silicone half-sphere mold for perfectly round and uniform domes.
- For added richness and texture, fold chopped nuts into the coconut base before shaping or sprinkle sea salt on top after coating with chocolate.
- Store the domes in an airtight container in the refrigerator for up to 1 week to maintain freshness and texture.


