If you are looking for a magical treat that combines the cozy warmth of hot cocoa with the festive charm of cupcakes, the Hot Cocoa Cupcake Mugs Recipe is exactly what you need. These delightful cupcakes capture all the flavors and fun of a steaming mug of hot chocolate, dressed up with creamy frosting, mini marshmallows, and candy cane handles that make every bite feel like a hug on a chilly day. Perfect for gatherings, parties, or any time you crave a nostalgic winter treat, this recipe will become your go-to for spreading smiles and sweet joy.
Ingredients You’ll Need
Trust me, the beauty of the Hot Cocoa Cupcake Mugs Recipe lies in its simplicity. Each ingredient plays an essential role in building layers of flavor, moisture, and that rich chocolatey goodness that dreams are made of.
- Duncan Hines® Classic Devil’s Food Cake Mix: Provides a deeply chocolatey and moist cupcake base that’s foolproof and flavorful.
- Swiss Miss® Milk Chocolate Hot Cocoa Mix: Adds an extra chocolate boost plus that unmistakable cozy, milky cocoa taste.
- Water: Hydrates the cake mix, helping to create the perfect batter consistency and tender crumb.
- Large Eggs: Bind the ingredients together and contribute to the cupcakes’ fluffy texture.
- Vegetable Oil: Keeps the cupcakes moist and gives them a wonderful soft crumb.
- Duncan Hines® Creamy Milk Chocolate Frosting: Adds a luscious, rich chocolate topping that melts in your mouth.
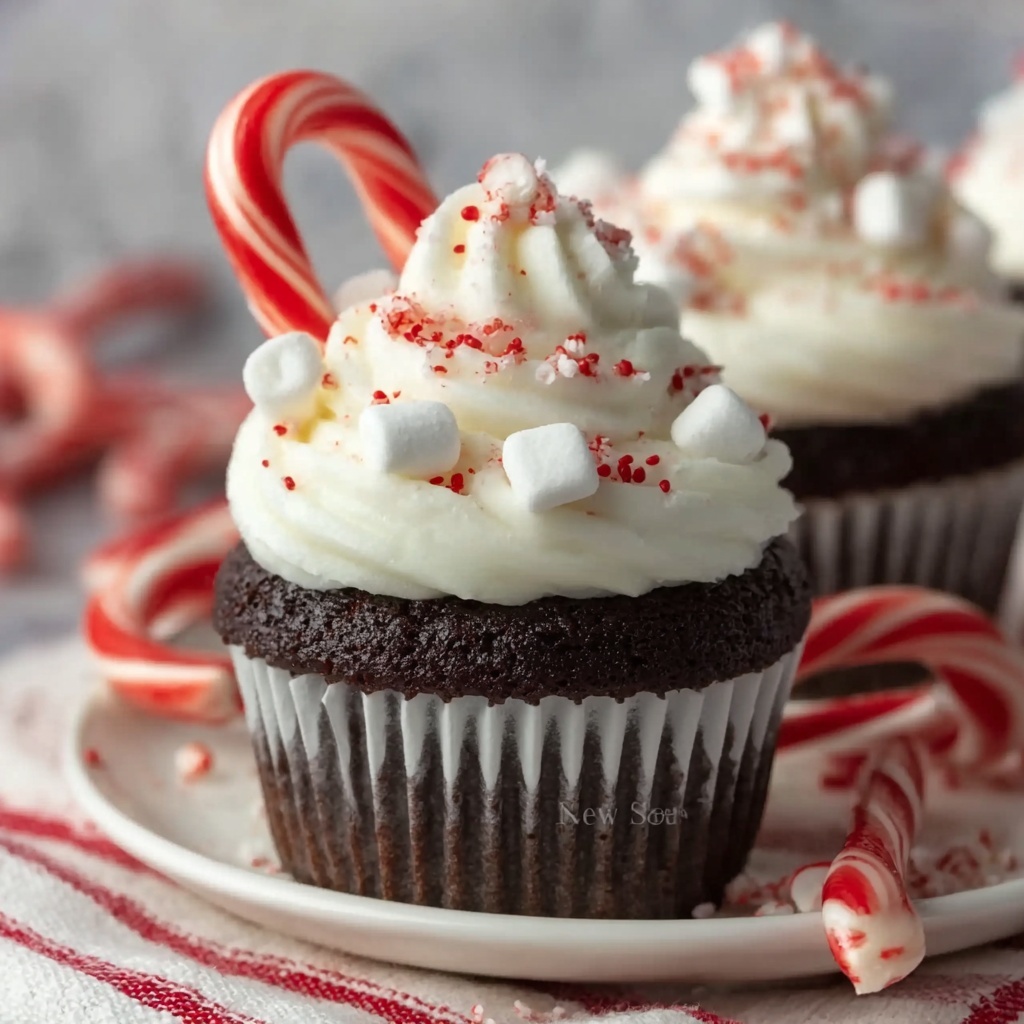
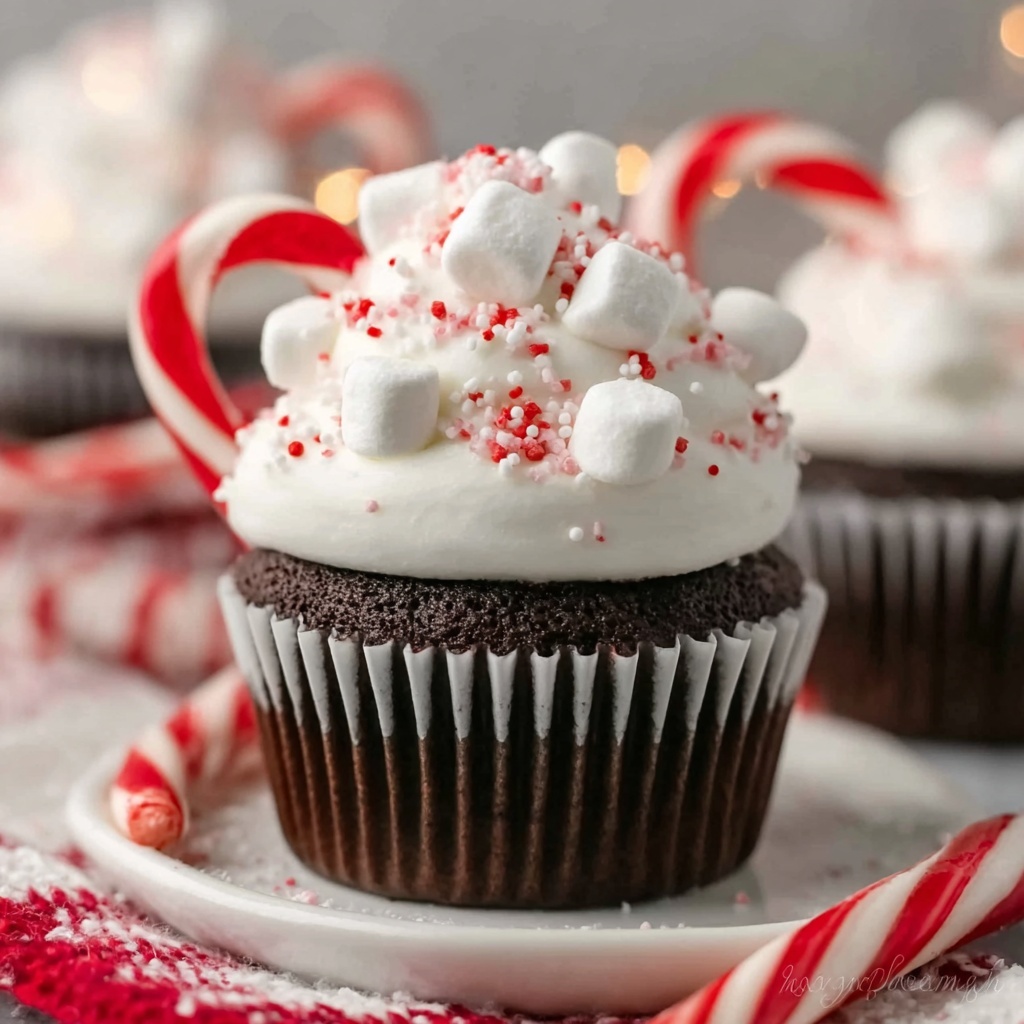
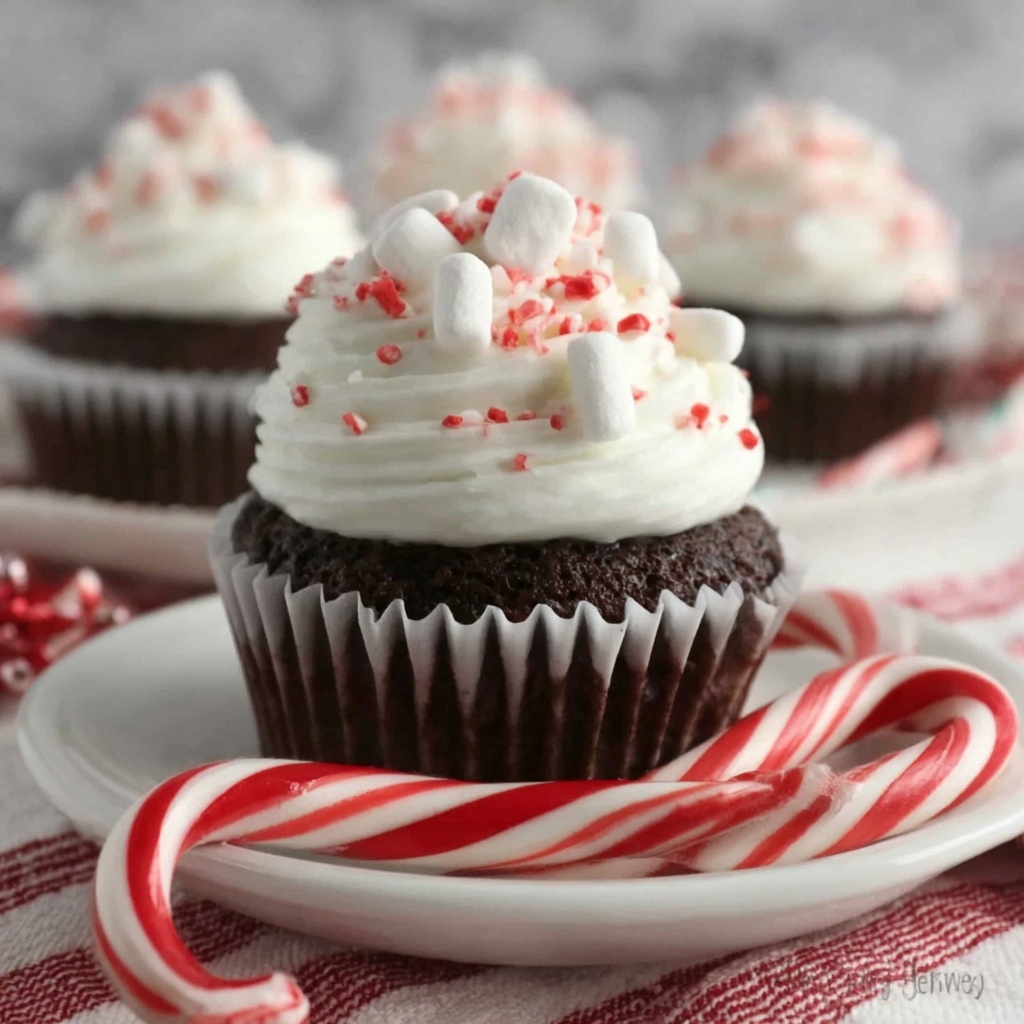
- Mini Candy Canes: Serve as adorable “mug handles” and provide a festive peppermint kiss.
- Milk Chocolate Chips: Sprinkle them on top for extra melty, chocolatey goodness.
- Miniature Marshmallows: Bring that classic hot cocoa comfort with a soft, gooey finish.
How to Make Hot Cocoa Cupcake Mugs Recipe
Step 1: Prepare the Oven and Muffin Pan
Start by preheating your oven to 350°F (175°C) to ensure an even baking temperature. Line a muffin pan with 24 baking cups; this helps your cupcakes bake evenly and makes cleanup a breeze. Getting this ready upfront sets the stage for perfect cupcakes.
Step 2: Mix the Batter
In a large bowl, combine the Duncan Hines Classic Devil’s Food Cake Mix and the Swiss Miss Milk Chocolate Hot Cocoa Mix. Add the water, eggs, and vegetable oil. Using an electric mixer on low speed, blend the ingredients for about 30 seconds to combine everything without splattering. Then crank the speed up to medium and beat for 2 minutes until the batter is smooth and velvety. This step is key to incorporating air, which ensures your cupcakes rise beautifully and stay light but rich in flavor.
Step 3: Bake the Cupcakes
Divide the batter evenly among the 24 baking cups, filling each about two-thirds full to leave room for rising. Pop the pan in the oven and bake for 16 to 19 minutes. Test for doneness by inserting a toothpick into the center of a cupcake; it should come out clean or with just a few moist crumbs. Once baked, allow the cupcakes to cool in the pan for 5 minutes. This helps them set without breaking. Then move them to a wire rack to cool completely before decorating.
Step 4: Decorate the Cupcakes
Now comes the fun part! Once completely cooled, generously frost each cupcake with the creamy milk chocolate frosting, spreading it to resemble the rich topping of a mug of hot cocoa. Next, take mini candy canes and carefully break off a small piece from the straight end to create a handle shape. Insert the curved candy cane gently into the side of each cupcake so it looks like an adorable mug handle. Finally, sprinkle milk chocolate chips and miniature marshmallows on top for that classic hot cocoa look. If you want to add a little festive flair, crush some candy cane pieces and sprinkle them lightly over the frosting for a peppermint crunch.
How to Serve Hot Cocoa Cupcake Mugs Recipe
Garnishes
To really elevate the presentation, try adding some whipped cream dollops or a drizzle of caramel sauce on top of the frosting. A sprinkle of cocoa powder or a dusting of powdered sugar can add a snowy touch that looks beautiful and tastes great. These little beauties are not just tasty, they’re a feast for the eyes.
Side Dishes
This treat pairs wonderfully with a warm beverage like real hot chocolate, a cup of coffee, or even a creamy chai latte. If you want to make a full dessert spread, consider serving alongside fresh fruit or a light vanilla pudding to balance out all that chocolate richness.
Creative Ways to Present
For parties, arrange the cupcakes in a circular pattern to mimic a mug of hot cocoa on a platter. Wrap a festive ribbon around the cupcake liners or use small paper flags with fun winter sayings to make them extra special. You can even place each cupcake in a mini gift box for a delightful edible favor that guests will love.
Make Ahead and Storage
Storing Leftovers
If you have leftovers (and honestly, who will?), store them in an airtight container at room temperature for up to two days to keep the cake moist and the frosting fresh. Avoid refrigeration as it could dry out the cupcake and make the frosting harder.
Freezing
You can freeze unfrosted cupcakes for up to three months by wrapping them tightly in plastic wrap and placing them in a freezer-safe bag or container. When you’re ready to enjoy, thaw them completely at room temperature before frosting and decorating to retain that fresh-baked feel.
Reheating
If you want to serve these warm, pop them in the microwave for 10 to 15 seconds or briefly in a low oven after thawing. Be careful not to overheat as the marshmallows and frosting might melt or become overly soft.
FAQs
Can I use homemade cake mix instead of boxed mix for the Hot Cocoa Cupcake Mugs Recipe?
Absolutely! While using the classic cake mix is convenient, a homemade devil’s food cake batter will work just as well and bring your personal touch to the cupcakes. Just be sure to add the hot cocoa mix as directed to preserve that special flavor.
What can I substitute for the mini candy canes if I don’t have any?
If candy canes aren’t available, you can get creative with pretzel sticks for a salty crunch, or even pipe a chocolate handle with melted chocolate and a toothpick. The visual handle adds charm but the cupcakes taste wonderful either way.
Do I have to use milk chocolate frosting, or can I try something else?
Milk chocolate frosting is classic for this recipe, but feel free to experiment! Cream cheese frosting, vanilla buttercream, or even a peppermint-flavored frosting can bring a fresh twist that’s still delicious.
Are these cupcakes suitable for kids’ parties?
Definitely! Kids adore the playful cupcake mugs complete with handles, marshmallows, and candy canes. Just be mindful if some kids have candy cane allergies, and you can easily leave those out.
How long does it take to make the Hot Cocoa Cupcake Mugs Recipe from start to finish?
From mixing to decorating, expect about 1 hour and 30 minutes. This includes baking time and cooling time, which is crucial for the frosting to stick and the candy handles to set perfectly.
Final Thoughts
You’re going to love how this Hot Cocoa Cupcake Mugs Recipe feels like a warm, chocolatey hug delivered in cupcake form. It’s festive, fun, and guaranteed to brighten any occasion. So gather your ingredients, invite some friends or family, and start baking to create memories one delicious bite at a time. These cupcake mugs are more than just dessert—they’re a celebration of comfort and joy you won’t want to miss!
Print
Hot Cocoa Cupcake Mugs Recipe
- Prep Time: 15 minutes
- Cook Time: 19 minutes
- Total Time: 34 minutes
- Yield: 24 servings
- Category: Dessert
- Method: Baking
- Cuisine: American
Description
These Hot Cocoa Cupcake Mugs are a delightful twist on traditional cupcakes, combining rich devil’s food cake and creamy milk chocolate frosting, topped with festive mini candy canes, chocolate chips, and marshmallows. Perfect for holiday parties or cozy gatherings, they look like little mugs of hot cocoa, making them both charming and delicious.
Ingredients
Cake Ingredients
- 1 package (15.25 oz) Duncan Hines® Classic Devil’s Food Cake Mix
- 2 envelopes (1.38 oz each) Swiss Miss® Milk Chocolate Hot Cocoa Mix
- 1 cup water
- 3 large eggs
- 2/3 cup vegetable oil
Frosting and Decoration
- 1 container (16 oz) Duncan Hines® Creamy Milk Chocolate Frosting
- 24 mini candy canes
- 1/2 cup milk chocolate chips
- 1/2 cup miniature marshmallows
Instructions
- Prepare the Oven and Muffin Pan: Preheat the oven to 350°F (175°C). Line a muffin pan with 24 baking cups to prevent sticking and ensure easy cupcake removal.
- Mix the Batter: In a large bowl, combine the Devil’s Food Cake Mix, Swiss Miss Milk Chocolate Hot Cocoa Mix, water, eggs, and vegetable oil. Use an electric mixer on low speed to combine ingredients for about 30 seconds, then increase to medium speed and beat for 2 minutes until smooth and well blended.
- Bake the Cupcakes: Divide the batter evenly among the 24 muffin cups. Bake in the preheated oven for 16-19 minutes, or until a toothpick inserted in the center comes out clean. Let the cupcakes cool in the pan for 5 minutes before transferring them to a wire rack to cool completely.
- Decorate the Cupcakes: Once cooled, frost each cupcake generously with milk chocolate frosting. Break 1/4 to 1/2 inch off each mini candy cane and insert the curved end into the side of each cupcake to create a ‘mug handle.’ Top each cupcake with milk chocolate chips and miniature marshmallows. Optionally, crush some candy cane pieces and sprinkle over the cupcakes for extra festive flair.
Notes
- Ensure cupcakes are completely cooled before frosting to prevent melting the frosting.
- Mini candy canes can be substituted with small cookie sticks for variation.
- Store cupcakes in an airtight container at room temperature for up to 3 days.
- For a gluten-free option, use a gluten-free cake mix and verify that all other ingredients are gluten-free.

