
“`html
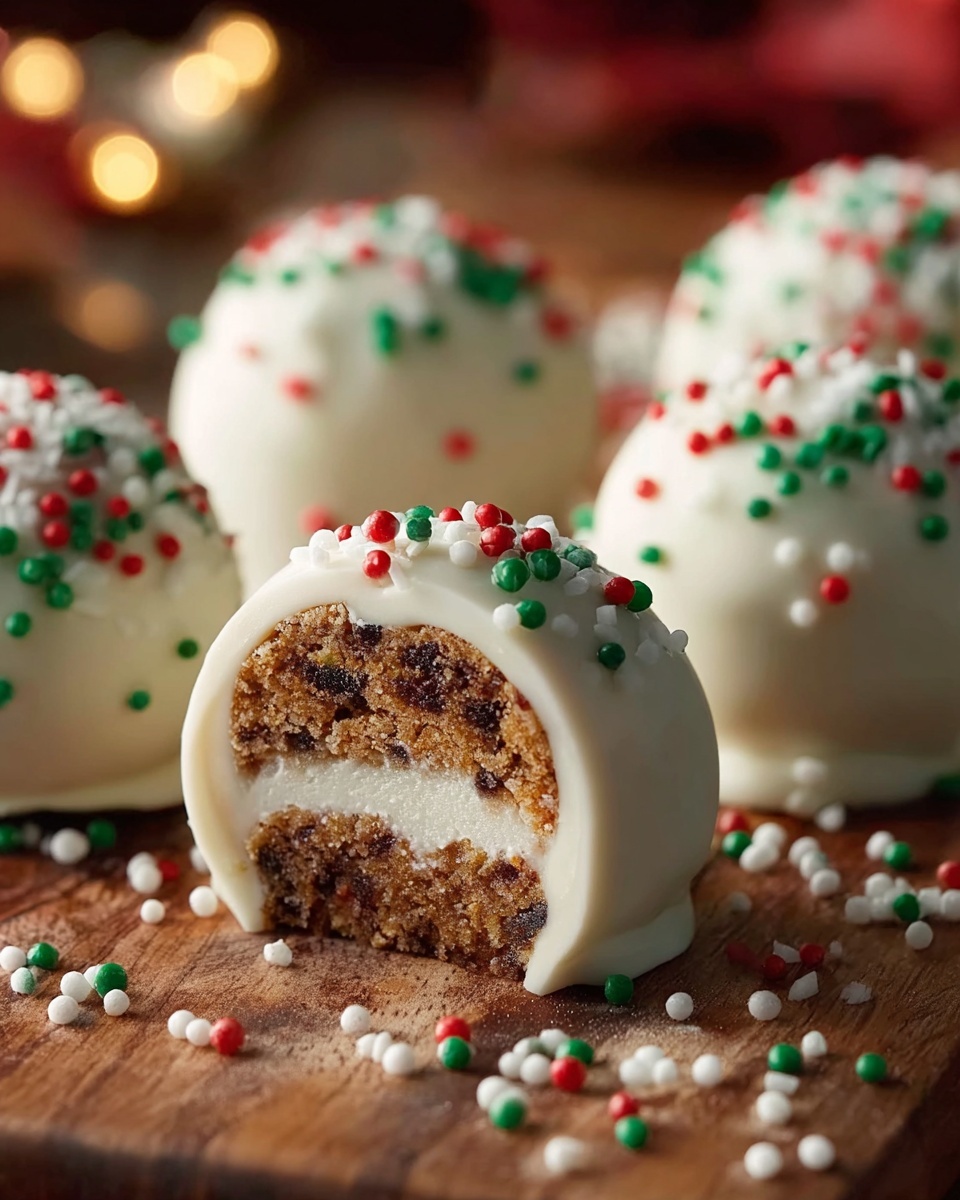
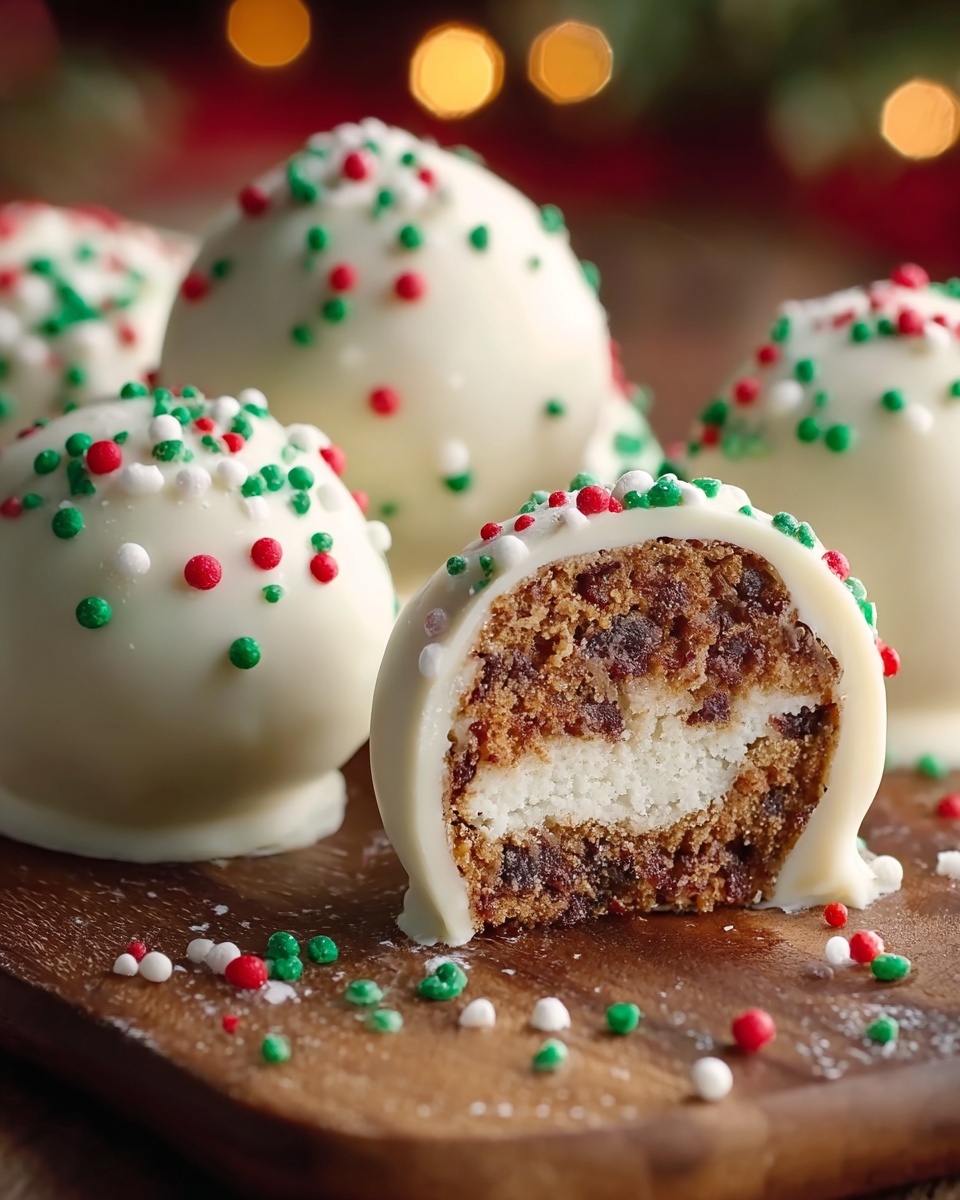
If you’re searching for a fun and festive treat that’s as delightful to make as it is to eat, the Little Debbie Christmas Cake Balls Recipe is your new holiday obsession. These bite-sized wonders combine the classic vanilla Christmas Tree Cakes with a luscious cream cheese blend, dipped in creamy white candy coating and finished with twinkling red and green decorations. Perfect for parties, gifts, or a cozy night at home, this recipe is an easy way to bring a sprinkle of holiday magic to your dessert table.
Ingredients You’ll Need
Gathering simple, accessible ingredients is all it takes to create these charming treats. Each component plays a vital role: from the tender texture of the cakes to the smooth tanginess of cream cheese, and the sweet snap of the candy coating that ties it all together.
- Two 5-count boxes of vanilla Little Debbie Christmas Tree Cakes: The star of the show, these provide moistness and the unmistakable festive flair.
- 1 (8 oz) package cream cheese, room temperature: Adds creaminess and helps bind everything into a pliable dough.
- 1 (16 oz) package white candy melts: Creates a crisp, sweet shell that encases the cake balls elegantly.
- ¼ cup red candy melts, melted (optional): Perfect for drizzling on top to add a pop of color and extra cheer.
- Red and green colored sanding sugar: Sprinkled for sparkle and to bring that unmistakable holiday vibe.
How to Make Little Debbie Christmas Cake Balls Recipe
Step 1: Crumble the Cakes
Begin by carefully unpacking your vanilla Little Debbie Christmas Tree Cakes and crumbling them into fine pieces inside a large mixing bowl. Breaking the cakes down thoroughly ensures a smooth mixture that’s easy to work with and melts in your mouth once formed into balls.
Step 2: Mix with Cream Cheese
Next, add the softened cream cheese directly into the bowl with the crumbled cakes. Use a sturdy spoon or your hands to combine them until you achieve a uniform, dough-like consistency. This step is crucial because the cream cheese binds the cake crumbs and gives the cake balls that irresistible, creamy texture.
Step 3: Form the Balls
Once your mixture is ready, scoop out small portions—about 1 inch in diameter—and roll each into a smooth ball between your palms. Placing them on a parchment-lined baking sheet at this stage helps keep them from sticking and makes the next steps seamless.
Step 4: Chill the Cake Balls
Pop the tray into the refrigerator for at least 30 minutes. Chilling firms up the balls so they won’t fall apart when dipped and ensures a perfect, polished finish once coated.
Step 5: Melt the Candy Coating
While the cake balls chill, gently melt your white candy melts per the package instructions. A smooth, creamy coating makes all the difference when dipping, providing a lovely crisp shell that locks in the soft center.
Step 6: Dip the Cake Balls
Remove the chilled cake balls from the fridge and one by one, dip them into the melted white candy coating. Make sure they’re fully covered for the best texture and appearance. Let any excess drip off before setting them back on the parchment paper.
Step 7: Decorate and Set
For a festive flourish, drizzle the melted red candy melts over the white-coated cake balls and generously sprinkle with red and green sanding sugar. This adds color, sparkle, and an extra hint of sweetness that is pure holiday joy. Let everything set completely before enjoying.
How to Serve Little Debbie Christmas Cake Balls Recipe
Garnishes
Adding a few holiday-themed garnishes instantly amps up the presentation. Consider festive sprinkles, edible glitter, or even tiny candies shaped like holly berries for that extra wow factor. The sanding sugar already gives a wonderful shimmer, but a touch of greenery on the side can bring your dessert plate to life.
Side Dishes
These cake balls pair beautifully with a warm beverage like spiced hot cocoa or a classic eggnog. If you want to go further, arrange them alongside a platter of seasonal fruits or nuts to balance the sweetness and add textural contrast.
Creative Ways to Present
Transform your Little Debbie Christmas Cake Balls Recipe into a centerpiece by stacking the balls in a festive tiered display or displaying them in mini cupcake liners for individual servings. Wrapping them in clear cellophane tied with a pretty ribbon also makes a perfect homemade gift that friends and family will adore.
Make Ahead and Storage
Storing Leftovers
If you find yourself with any leftovers, store your cake balls in an airtight container in the refrigerator. They’ll stay fresh and maintain their texture for up to a week, making them an excellent make-ahead dessert option during the holiday rush.
Freezing
Want to prepare well in advance? You can freeze these cake balls by placing them in a single layer on a baking sheet, freezing until solid, then transferring them to a sealed container or freezer bag. When properly stored, they keep for up to three months without losing any flavor or quality.
Reheating
Since these treats are best served chilled, reheating isn’t necessary. Allow frozen cake balls to thaw completely in the refrigerator before serving, ensuring the cream cheese filling stays creamy and the candy coating retains its delightful snap.
FAQs
Can I use other flavors of Little Debbie Cakes?
Absolutely! While the recipe shines with vanilla Christmas Tree Cakes for that classic holiday taste, you can experiment with other flavors like chocolate or pumpkin spice to create your own festive twist.
Do I need to refrigerate the cake balls after making them?
Yes, refrigeration is important to help the cream cheese filling set and keep the candy coating firm. It also extends their shelf life and enhances the overall taste experience.
Can I substitute cream cheese with something else?
Cream cheese is key for texture and flavor, but if you need a substitute, try mascarpone or a softened buttercream frosting. Keep in mind this might alter the richness and consistency slightly.
What if I don’t have candy melts?
If candy melts aren’t available, you can use white chocolate chips or coating chocolate, but melt them carefully and add a bit of vegetable oil to achieve a smooth, dip-friendly texture.
How long do these cake balls last?
Stored properly in the fridge, these treats remain fresh for about one week. For longer storage, freezing is a great option and they maintain their taste and texture well.
Final Thoughts
The Little Debbie Christmas Cake Balls Recipe is a joyful way to celebrate the holidays with something homemade yet effortless. Their delightful combination of creamy, sweet, and festive flavors will make them a fast favorite at your gatherings. I can’t encourage you enough to try this recipe—it’s pure holiday magic rolled into every bite!
“`
Print
Little Debbie Christmas Cake Balls Recipe
- Prep Time: 15 minutes
- Cook Time: 5 minutes
- Total Time: 20 minutes
- Yield: 24 servings
- Category: Dessert
- Method: No-Cook
- Cuisine: American
Description
These Little Debbie Christmas Cake Balls are a festive and delicious treat made by combining crumbled vanilla Christmas Tree Cakes with cream cheese, then coating them in melted white candy melts. Perfect for holiday parties or a sweet seasonal snack, they are easy to make and decorated with colorful sanding sugar for a cheerful touch.
Ingredients
Ingredients
- Two 5-count boxes of vanilla Little Debbie Christmas Tree Cakes, crumbled
- 1 (8 oz) package cream cheese, room temperature
- 1 (16 oz) package white candy melts
- ¼ cup red candy melts, melted (optional)
- Red and green colored sanding sugar
Instructions
- Crumble the Cakes: In a large bowl, crumble the Little Debbie Christmas Tree Cakes into fine pieces to create the base of your cake balls.
- Mix with Cream Cheese: Add the room temperature cream cheese to the crumbled cakes and mix thoroughly until a smooth, dough-like consistency forms.
- Form the Balls: Scoop out portions of the mixture and roll them into small balls approximately 1 inch in diameter. Place them on a baking sheet lined with parchment paper.
- Chill: Refrigerate the cake balls for 30 minutes to allow them to firm up for easier coating.
- Melt the Candy Coating: While the cake balls chill, melt the white candy melts according to package directions until fully smooth.
- Dip the Cake Balls: Remove the chilled balls from the refrigerator and dip each one into the melted white candy melt to coat completely.
- Decorate: Place the coated balls back on the parchment-lined baking sheet. For a festive look, drizzle melted red candy melts over the tops and sprinkle with red and green sanding sugar.
- Set and Serve: Allow the candy coating to set completely before serving. Enjoy your festive and sweet Little Debbie Christmas Cake Balls!
Notes
- Ensure the cream cheese is at room temperature for easier mixing and a smooth texture.
- You can substitute the red candy melts with any other color to match your holiday theme.
- Store leftover cake balls in an airtight container in the refrigerator for up to 5 days.
- If the candy coating thickens before dipping, gently reheat it to maintain a smooth consistency.

